Crispy Honey Sriracha Chicken Wings – Ladies and Gentlemen, We Have a Winner

Every year about this time, I get a bunch of emails asking which of our previously posted oven-fried chicken wing methods is the best. I never know how to respond, since I think they’re all pretty close, but now I finally have a definitive answer…this one!

By the way, the honey-sriracha glaze is quite delicious and incredibly simple, but merely an afterthought here. The real star of the show is the strange, but effective technique of coating the wings with a baking powder-laced spice rub before baking. Through the magic of chemical reactions, the surface of the chicken becomes bone-dry, and eventually crisps up to something very similar to what would come out of a deep fryer.

Instead of the soft, slippery skin associated with most oven baked wings, we get a crispy, blistered surface that really holds onto whatever glaze you decide to toss your wings with. The surprising thing is, once these are cooked you would never know baking powder was involved.

I’m not exactly sure who originally invented this; I heard about it via America's Test Kitchen, but that doesn’t really matter, since the only thing that really matters is who people 10 years from now think invented this. And if this is video somehow goes viral, that could be me. To that end, I really hope you give this unusual, and highly effective method, and honey-sriracha sauce a try soon. Enjoy!


Ingredients for 4 portions:
2 1/2 pounds chicken wing sections
1 tbsp kosher salt
1 tsp freshly ground black pepper
1 tsp smoked paprika
2 tbsp baking powder (aluminum free)
- Coat wings, and bake at 425 F., turning every 15-20 minutes, until they are browned and crispy. Total cooking time will be about 1 hour, but that depends on the size and temperature of your wings.

For the Honey Sriracha glaze:
1/3 cup honey
1/3 cup Siracha
1 tbsp seasoned rice vinegar
1/4 tsp sesame oil
sesame seeds to garnish

Bluetons (Blue Cheese Croutons) – Trademark Pending

As promised, here are the blue cheese croutons you saw floating on top of the roasted apple and parsnip soup we posted yesterday. They were just perfect together, and as I ate my soup, dozens of other, “perfect togethers,” easily came to mind.

We only use three ingredients here, which is why this works so well. Try to resist the temptation to add salt, pepper, or other spices, as the blue cheese will provide all the punch you need. We’re going for pure blue cheese flavor in a buttery, crunchy package, and anything else would just get in the way.

Another tip here is to use bread that’s not too stale. I find that dry bread makes a crispy-hard crouton; verses fresher bread, which has more crispy-brittle texture. You can file that one under theories I can’t prove, but don’t need to.

The type of blue cheese really doesn’t matter to the technique, but the sharper, and more intense the flavor, the better. Like I always say, you're the boss, so use whatever you like. Speaking of which, Michele gets credit for the, "Louis Vuitton of your blue cheese crouton" line. I was going to go with "the Chef John of..." but hers was much better.

I guessed at some amounts below, but you don’t need those, since this is simply as much butter and cheese as you feel comfortable with. I hope you give these blue cheese croutons a try soon. Enjoy!


Ingredients for 8 portions Blue Cheese Croutons:
1/2 loaf fresh or day old bread (try to use something not already dry and hard)
5-6 tbsp hot melted unsalted butter
2-3 ounces strong blue cheese, placed in freezer until firm
*bake at 350 F. until browned and crisp. 

Edible Holiday Gift Idea: Candied “Buddha’s Hand” Citron

Welcome to our annual homemade edible gift episode, where you finally figure out what to get that “special” (aka super-picky and has everything) foodie on your holiday list. By the way, if you’re a fan of candied citrus, you ‘ll want to make extra, since Buddha’s Hand is a unique and special treat.

To me this crazy looking fruit tastes/smells like a really fragrant Meyer lemon with hints of grapefruit, and if you can find it, I recommend you give it a go. It’s not cheap, but what is? If you can’t find it, don’t despair; this technique works perfectly fine with strips of orange or lemon peel.

Regarding the blanching step I mention in the video; I heard that pre-boiling wasn’t necessary for this fragrant fruit, as it’s not as bitter as other types of citrus, so I tested it both ways, and I’m glad I did.

The batch I boiled in water first had virtually no bitterness left, and still had a fairly strong citrus flavor. The batch that was candied raw definitely had a more fragrant aroma and vibrant taste, but unfortunately there was a distinct bitter aftertaste.

So, I recommend the boiling step, especially if you’re going to be making this primarily as a candy. If you were going to be cooking with it, in things like fruitcakes, then you could probably get away with the bigger flavor, and slight bitter edge.

Either way, I hope you can get your hands on some of these hands, and give this fun, and easy to make holiday confection a try. Enjoy!


Ingredients for about 2 cups of candied citron:
(warning, I didn’t measure very carefully, but that doesn’t matter here. As long as you have enough simple syrup to cook your citrus in, you are fine)
3 cups cubed Buddha’s Hand citron, washed thoroughly, or other citrus peel, sliced into 1/4-inch strips (simmer in plain water for 20-30 minutes before candying step)
2 1/2 cups sugar (plus extra for tossing the candied fruit in)
2 cups water
- cook on medium heat, stirring, until the syrup reaches 230F.

Crispy Honey-Glazed Ham – Looks, Tastes, and Sounds Like the Holidays

A great holiday ham glaze needs to have three things; a wonderful flavor, a gorgeous, shiny appearance, and a crispy, crackling crust you can hear across the room. I’m happy to report this easy to make glaze has all those things in abundance.

This honey glaze will work on any size or style of ham, and as long as you keep the mixture quite thick, and caramelize it properly at the end, you will be the proud owner of a magazine cover-quality ham.

As I mention in the video, this was an uncured, fully-cooked, country-style ham, and if you use something similar, I’m recommending you pull it at 130 F. internal temp. Remember, ham is already cooked, so we just want it hot enough to eat. By the way, if you’re using a ham that’s not cooked already, you’re on your own!

The type of ham I used doesn’t contain a lot of added water like most hams in the supermarket, so it’s even more crucial to use a thermometer to achieve the proper temp. The meat has a denser, drier texture, and while the payoff is a superior ham flavor, it can get dry and salty if overcooked.

If you're using a standard ham, you can use the exact same procedure, but maybe go to 140 F., since you have a lot wetter product to work with. I realize many guides say to go to 160-180 F., but I have no idea why.

No matter what ham you use, you’ll need to give the glaze a final caramelizing before it gets anywhere near kale and tiny apples. They say you can crank the oven up to 500 F., or use the broiler, but nothing does a better job than the old blowtorch. If you don’t have one, they’re only $15 at a hardware store, and are an invaluable tool in the kitchen.

So, if a holiday ham is on your menu, I really hope you toss out that packet of who-knows-what, and give this wonderful, crispy honey ham glaze a try. Enjoy!


Enough glaze for a 7-9 pound ham:
1 packed cup light brown sugar
1/4 cup honey
2 tbsp Dijon mustard
2 tbsp rice vinegar (or any vinegar), or enough to make a thick paste
pinch of cayenne
1 1/2 tsp freshly ground black pepper
1/2 tsp Worcestershire sauce
For the water in the roasting pan:
2 whole star anise, and a bunch of whole cloves

- Bake ham at 325 F., glazing every 20 minutes until the internal temp is 130 F. for country-style hams, and 140 F. for regular hams.

The Cornish Pasty – Going to Fall Down a Mineshaft? This is the Meat Pie For You!

This Cornish pasty is one of those rare recipes that novice cooks will find easier to make than experienced bakers. That’s because to make this to its original, and very sturdy specifications, you’re forced to over-mix the dough…a cardinal sin that literally gives pie makers nightmares.

Like any pastry dough, we’re just adding just enough ice water to bring everything together, but unlike classic pie dough, we’re going to knead the mixture for a couple minutes past that point.  Thanks to a little thing called muscle memory, this is not going to be easy for some of you.

Get over it; because once you taste and feel the final product, it will all make sense. The tougher, but not tough dough is the perfect delivery system for the meaty filling. Speaking of which, I went with a fairly traditional version, and provided the recipe below, but this great crust will work with all sorts of stuffings.

You could use cooked meat in these, but part of what makes them so good, is how the raw ingredients cook in their own juices, while encased in the tasty dough. I can’t imagine many things that wouldn’t be great in these.

By the way, this recipe is dedicated to my mother-in-law Peggy, who requested it about five years ago. It was one of her favorite foods growing up, and I’m curious to hear how close I got. I hope you give this easy, and delicious meat pie a try soon. Enjoy!


Ingredients for 4 Cornish pasty

4 cups bread flour (mine weighed in at 1-lb 2-oz)
2 oz (4 tbsp) cold butter
3 oz (6 tbsp) cold lard
1 1/2 tsp salt
about 2/3 to 3/4 cup ice water, or enough to just bring dough together (start with about 1/2 cup, and then drizzle in more as needed)

For the steak filling:
12oz cubed beef skirt steak
1/2 cup diced onions
1 cup diced gold potatoes
1/3 cup diced turnip
1 1/2 tsp salt
1 tsp freshly ground black pepper
pinch of cayenne
2 tbsp butter, cut into 8 thin slices

For the egg wash:
1 large egg, beaten with 1 tsp water

- Bake pasties at 350 F. for about an hour or until browned and bubbly

Pine Cone Cheese Ball – So Good, You’ll Want to Hug a Tree

Any cheese ball is a welcome addition to a holiday party spread, but when you bring one that looks like a pine cone, you’re talking about a real showstopper. 

The only danger, as I joked about in the intro, would be hurting the feelings of other guests who also decided to bring a cheese ball, sans camouflage. Hey, they’ll just have to raise their game next year.

Obviously, this seasonally appropriate appetizer can be made using any cheese spread, or cheese ball recipe, but if you’re going to use this one, which comes highly recommended, we should talk about the garlic. I love raw garlic, and since I felt a little cold coming on, I decided to be generous with the amount.

For normal people, two cloves might be a little strong here, so fair warning. If you’re a fan of roasted garlic, that would be beautiful in this as well. Also, if you’re a fan of our beer cheese recipe, there’s no way that wouldn’t be perfect too. I really hope you give this easy, delicious, and gorgeous-to-look-at pine cone cheese ball a try soon. Enjoy!


Ingredients for one giant or two normal size pine cone cheese balls:
2 package (8 ounce ea.) cream cheese
4 ounce goat cheese
Salt, pepper and cayenne taste
1/2 to 2 cloves minced garlic, depending on how strong you want it, or roasted garlic cloves to taste
3 tablespoons chopped Italian parsley
2 tablespoons chopped fresh tarragon
1 tablespoon picked fresh thyme leaves
whole almonds as needed

Whole Boneless Thanksgiving Turkey – As Close to Turducken as I’ll Ever Get

If you’re a turkey, and you’re getting boned-out, there’s a good chance you’re about to become Turducken, which in this chef’s opinion, is one of the most overrated recipes of all time. When was the last time you sat down in a restaurant and thought, “I hope the chef’s doing a turkey, duck, chicken trio.”

However, the idea of removing those pesky bones before your bird makes its grand entrance may be worth considering. Not only do you get an impressive looking roast to wow the table, but carving is significantly easier. I didn't have time to show here, but of course you are making a killer turkey stock with all those bones, so that's another advantage. Also, if you're worried about losing flavor, don't. This tastes virtually identical. 

If you’ve ever found yourself hacking up a perfectly good turkey in front of the family, while flop-sweat drips onto the mangled meat, then this approach may be for you. Sure, it takes a good hour to prep, but that’s pretty much where the hard work ends.  

These types of videos are near impossible to edit into any reasonable length, but the good news is this is a lot easier to do than I make it look. Just go slow, and keep that knife against the bone, and you’ll be fine. By the way, chickens make an affordable and delicious thing to practice on.

I’ve included my “prop” stuffing below, which was great. It’s more the style you’d see in a stuffed pork chop, but as I said in the video, your favorite stuffing will work beautifully.

I’ve also posted a bonus video below that goes into more detail on the tying technique. So, if you’re looking for a new and exciting challenge for Thanksgiving, I hope you give this a try. Enjoy!


Notes:
  • My turkey was about 15 pounds, but this will work on any sized bird.
  • I wanted to try salt only on the outside, without butter or oil, like in our salt chicken recipe, just to see what would happen, but nothing did. So, feel free to slather on the butter.
  • You’ll need about 3-4 cups of prepared stuffing depending on the turkey.
  • My pan sauce was nothing more than the drippings with a big splash of cream, reduced until slightly thickened, and strained.  
Procedure:
Start in a 450 F.  oven for 15 minutes
Reduce to 325 F. until you get an internal temperature of 150 F. (mine took about 1 1/2 hours more)

For the stuffing I used:
1 1/2 cup plain breadcrumbs
1/2 cup butter
1/4 cup finely minced onions, sautéed golden
1/4 cup dried cranberries
1/4 cup golden raisins
1/2 cup turkey or chicken broth, or enough to moisten
salt and pepper to taste
1 tbsp chopped fresh sage
1 tbsp chopped fresh tarragon
2 tsp fresh thyme leaves
2 tsp fresh chopped rosemary leaves


Bonus Knot Tying Video

Homemade Flatbread – If You Have Flour, You Have Bread

As I’m sure you’ve heard by now, possibly in our last post, today is National Homemade Bread Day. So, I decided to do a flatbread video, demonstrating what was probably the world’s first wheat-based bread.

It never ceases to amaze me how a little flour and water can be transformed into such delicious, gorgeous bread, and in just a matter of minutes at that. Inspired by the thought of these earliest flatbreads, I went with about half wheat flour and half all-purpose, as well as a little spoon of corn meal for some extra texture. 

I’ll be giving no ingredient amounts below. Flatbread’s not like that. Combine water, flour and a pinch or two of salt; and mix together as shown until you have a soft, sticky dough. That’s it. The other key is to use a very hot cast iron pan or griddle. You can wipe the surface with a tiny bit of vegetable oil, but basically a dry pan works the best.

If you’re not in a hurry, wrap your dough and let it sit on the counter top for an hour or two. This will give the flour time to hydrate, which will provide a little nicer texture. Having said that, I didn’t wait at all, and mine came out fine.

So, if you’re interested in making flatbread like they did when people thought the earth was flat, then I hope you  get this easy and delicious technique a try soon. Enjoy!

How to Make Puff Pastry Shells – Vol au Venting!

As promised, here’s the video for how to make your own puff pastry shells, or vol au vents, as they'd be called in France, and select U.S. locations. These are fairly simple to make, and once baked the real fun begins, as they can hold so many amazing fillings, both sweet and savory.

The key is making sure your puff pastry dough is very firm, and very cold, preferably still partially frozen, before you start cutting it. You want nice clean cuts, because if you mash the layers of pastry together, your shells will not rise as high, and they can also bake into some strange shapes. Having said that, even though I was filming, and working way too slowly, these still came out pretty well.

Once they’re filled they look great, so it’s not that big of a deal, but in general, the colder the dough, the nicer the final product. Other than being too rough with the dough, the other common mistake is under cooking. Your shells might look beautiful at 15 minutes, but may still be kind of raw inside. As long as the outside is not getting too dark, don’t be afraid to let them bake a bit longer.

Regarding the scraps. You can’t re-roll the trimmed puff pastry and have the shells come out the same, but what you can do is cut it into irregular shapes, egg wash it, and dust with cinnamon and sugar. Once baked to a crispy, golden-brown, you’ll have a great little sweet treat to serve with coffee or tea. I hope you give this easy and fun technique a try very soon. Enjoy!

The Great Parmesan (Parmigiano-Reggiano) Experiment! – Penny Wise, Parm Foolish

I've wanted to do this little demonstration for a long time now, and it has nothing to do with proving people wrong. Okay, that has a little bit to do with it, but mostly I really want people who could be enjoying “the good stuff,” but don't because they think it’s too expensive, to finally realize that's not the case.

As you'll see, a little bit of real, imported Parmigiano-Reggiano only costs about 20 cents per serving. Basically, for the price of a large gumball, you could be enjoying this world-class cheese. Of course, some people still won't buy Parmigiano-Reggiano, even after seeing this.

For them, cost really has nothing to do with it. This is a convenient excuse they use because they secretly enjoy that stuff in the green canister. Hey, there's nothing wrong with that. To each his own, but at least be honest, and don't claim frugality as your motivation.

By the way, I edited this video while in New York visiting family, and somehow lost a small portion of the audio. So, in the middle of the clip you’ll hear a change in the quality, from the usual mediocre sound, to something much worse. I didn’t want to wait until I got back into the studio to re-record, so I'm posting as is.

Nevertheless, I hope I’ve persuaded some of you to switch over to what you should have been using all along. As a wise man once probably said, “Life’s too short for fake cheese.” Enjoy!

Easy “Squeezy” Corn on the Cobb

I saw this technique on the Huffington Post a while back, and while it wasn’t the first time I’d seen, or used the micro-method, it was the first time I’d seen it in video form, thanks to the lovely and talented, Carl Blemming. By the way, I’m assuming Huff Po didn’t pay him anything for it, so to make up for that, neither will we.

This proves something that I’ve known for years…no matter how great a kitchen technique is, unless you use it regularly, you’ll forget about it. Usually, as soon as I get home from the store, I shuck the corn, and go from there, but as soon as I saw that ear go into Carl’s microwave, it all came back. Now I can forget about it all over again.

I’ve heard through the grapevine that some other food channels have also published this “hack” recently, but since I don’t watch anyone else, I can’t confirm those reports, but I couldn't have been the only one. The point is, it works. It works perfectly, and I hope you give it a try soon. Enjoy!

Broiled Chicken – Welcome to Plan “B”

I once heard Alton Brown say that a broiler is nothing more than an upside-down gas grill, which is certainly not how most Americans think of theirs. While most people are fine melting cheese over their nachos with it, or browning a casserole, the broiler is seldom used to cook meats.

Well, the next time rain ruins your dream of a grilled chicken dinner, I hope you fire it up, and give this easy, alternative method a try.  Not only are you getting the same intense, direct heat, but you also have more control, since you can adjust how far the chicken is from the flame. I prefer the meat about 7-8 inches under the heating element, but feel free to adjust as needed.

As you’ll see, I like to flip mine over every 6-7 minutes until it’s done. This should take between 30 and 40 minutes, but that can vary greatly depending on the size and temperature of you chicken, as well as your broiler’s heat.

By the way, you’ll want to finish with the skin side up, so the bird gets a nice, crisp finish. This is important, especially if you’re recording sound effects. I hope you give this simple and delicious broiled chicken a try soon. Enjoy!


For 2 portions:
3 pound chicken, cut in half, back bone removed
salt as needed
lemon and fresh herb to finish
- Broil on high for about 30-45 minutes, turning often, or until done. 
*Note: Some glass baking dishes will shatter under a broiler, so unless you're sure yours is high-heat proof, a metal pan is a better bet. 

How to Make Your Own Temporary Brick Grill

Whenever I post a video involving my grill – a common occurrence this time of year – I get a bunch of emails asking what kind of grill I’m using, and the reply is always the same. It’s a charcoal-version of the Weber “Q,” and you can’t buy one because they stopped making them. Sorry, but I think I have an idea.

With just a few dollars worth of bricks, and a cast iron grate, you can reproduce the same basic grill I’m using. Besides, yours is going to look a hell of a lot cooler, and you can tell your hipster friends it was made from “reclaimed bricks.” Just be sure to use plain clay bricks. You certainly don’t want anything that’s been treated with chemicals and/or will explode. If you get these at a home improvement store, be sure to ask the guy. In fact, ask that guy’s boss.

As far as the grate goes, if you want to splurge, order the porcelain-coated, cast iron versions that the major brands use. They all sell replacement grates, but just about anything will work, since you can change your brick layout to make it fit. If you want to save a few bucks, check the online auctions, as well as outdoorsy stores, and flea markets.

Besides working beautifully, it’s temporary state is perfect for people who only grill two or three times a summer. Just set it this up in some back corner of the yard, and break it down when the weather turns. I hope you give this fun DIY project a try soon. Enjoy!

UPDATE: Apparently you don't want the ash from charcoal briquettes in your garden. However, the ash from natural wood charcoal is desirable, so there you go.

Prison-Style Meatloaf – How to Stretch Your Meat Further

The main point of this prison-style meatloaf video is to show you what happens when you make meatloaf like your grandparents did. And no, I'm not accusing your relatives of spending time in the joint. During the Great Depression this type of dish was a popular strategy for stretching what little meat you had, into as filling a meal as possible.

As times got better, people went back to meatier versions, and now only low-budget, high-volume food service operations feature this culinary dinosaur. I did an Italian meatball-inspired version, which was quite nice, but this method will work with virtually any meatloaf recipe.

Most modern meatloaves call for about 1/2 to 3/4 cup of dry crumbs per two pounds of meat, and here we’re using 1 1/2 cups. It makes a significant difference in the texture, producing something much softer and moister. While not as "meaty," this does make for an interesting alternative to play around with. I'm looking at you, family of 10.

As I say in the video, I decided to spike my tomato sauce with too much balsamic vinegar, which rendered it not great. So, if you’re going to follow this recipe, just use a regular pasta sauce, or your favorite meatloaf glaze. I hope you give this a try soon. Enjoy!


Ingredients for 1 giant meatloaf (about 10 large portions):
1 tbsp olive oil
1 tbsp butter
1 onion, diced
4 cloves garlic, minced
2 pounds ground chuck
2 tsp salt
1 tsp freshly ground black pepper
cayenne to taste
2 large eggs, beaten
2 oz Parmigiano-Reggiano, finely grated (about a packed 1/2 cup)
1/2 cup chopped Italian parsley
1 1/2 cups very dry white bread crumbs (not toasted!)
1 1/2 cups milk to soak (squeeze out excess)
3 or 4 cups of tomato sauce to bake in, optional

Chocolate Cream Puff Swans – Oh, Mama!

Mother’s Day is coming up soon, and these chocolate ganache-filled cream puff swans would be a great way to say thanks to her for that whole giving you life thing. I think once she tastes them, she’ll agree that it was all worth it after all.

This is mostly a technique video, as these beautiful birds would work with any number of fillings. Pastry cream, lemon curd, mousse, and fresh fruit are all perfect with this pâte à choux delivery system. This classic French dough has a thousand uses, and must be mastered by any serious cook. 

By the way, these are much better chilled, so make them an hour or two ahead. The one I eat in the video wasn’t well chilled, and you can see was pretty soft. Once cold, the chocolate ganache becomes very truffle-like, the whipped cream firms up, and you get something much more toothsome. So whether you do these for Mother's Day or not, I really hope you give these a try soon. Enjoy!


Pâte à Choux (Cream Puff Dough)
*enough for about 8-10 “swans”
1/2 cup water
1 tsp sugar
4 tablespoons unsalted butter
pinch salt
1/2 cup flour
2 eggs
*Bake "bodies" at 425 F. for 20-25 minutes, necks for about 12 minutes

For the ganache (makes extra):
4 oz dark chocolate, chopped
4 oz boiling heavy cream

For the whipped cream:
1 cup very cold heavy cream
1 tsp vanilla
1 tbsp sugar or to taste
*whip cream to soft peaks, add sugar, and whip to firm peaks

How to Debone & Butterfly a Leg of Lamb for Fun and Profit

As promised, here’s the video for how to debone and butterfly your own leg of lamb. Since I am going to save you a few dollars, when the butcher asks you if you want it deboned, I'd appreciate it if you said something like, “I watch Food Wishes, so I’ve got it covered.” By the way, I was only half kidding about using a fat, dull knife. 

Bored cooks have been known to do this with butter knives, steak knives, pairing knives, or any other knife they think would win them an after shift beer (I've heard from a friend). The point is, cooks drink a lot, and you don’t need a razor-sharp blade to do this at home. So, if you’re doing a whole leg of lamb this Easter, I hope you give this simple technique a try. Have a great holiday, and as always, enjoy!

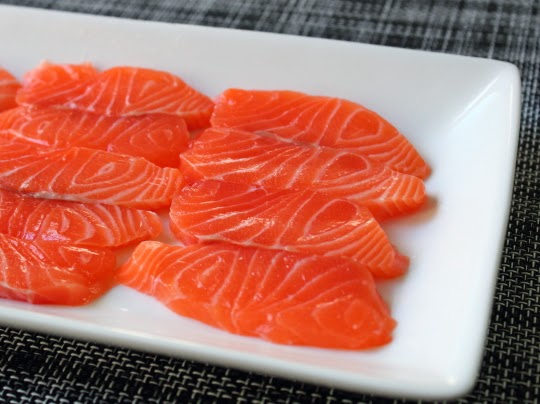
“Quick Cured” Salmon – 3 Minutes? But I Want it Now!

Whenever I hear people criticizing millennials for being self-absorbed, having short attentions spans, and for expecting to get what they want, exactly when they want it, I think to myself, “Hey, that sounds like my generation!” Well, if that’s the case, then they’re (and we’re) going to love this quick-cured salmon technique.

While the process is incredibly simple, the potential variations are endless. Whenever I show a new technique, I usually keep things simple, as to not distract people, but whether you’re talking about the brine, or post-cure seasonings, this is something that begs for adaptation.

Smoked salt, chipotle, or smoked paprika could be used before or after the cure to make things a little loxier, and don’t even get me started on the herbs. After the 3-minute cure, you can sprinkle your slices with dill, tarragon, chervil, and/or thyme, before the refrigeration stage. Speaking of impatient millennials; this is technically ready to eat after the three minute dunk, but you’ll enjoy this much more if you thoroughly chill it first.

Besides the flavorings, you can also play around with how thin/thick you slice the salmon, as well as how long you brine it. For me, if I slice the fish about 1/4-inch thick, three minutes is just about the perfect cure time for my desired texture and saltiness. However, you should experiment. Longer curing times, or thinner slices will result in a firmer, saltier product.

Of course, all that experimenting is going to make you hungry, and you’ll still need to decide how you’re going to serve it. I’ve suggested three delicious directions herein, but I’m fully confident you’ll come up with some stellar spin-offs as well. I hope you give this a try soon. Enjoy!

FOOD SAFETY NOTE: Much like rare meat, oysters, and raw eggs, if you’re concerned about the safety of eating homemade, cured salmon, you should do some research, and decide for yourself if it’s worth the risk. This technique works great with frozen salmon, which apparently kills potential parasites, so that’s one option. Anecdotally, I can tell you I’ve done this, and similar procedures, countless dozens of times with fresh salmon ("sushi grade" from a reputable, local purveyor), and have lived to tell the tale. Good luck.


Brine for to cure about 1 pound of salmon:
2 1/2 cups cold water
1/2 cup Kosher salt – I used Diamond Crystal brand
1/3 cup sugar

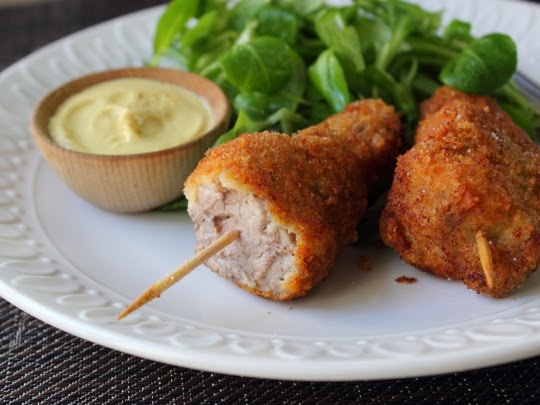
City Chicken – Hey, Nice Legs!

This fascinating pork on a stick recipe is American cuisine in a nutshell. City cooks, who couldn’t get chicken, would take scraps from much-cheaper-at-the-time pork, and build something similar to what you see here; but that’s not what makes this delicious mock drumstick so American.

Why this represents the true spirit of American food, is that long after chicken became cheap and plentiful, people kept making and eating this anyway. Yes, in cities across the Rust Belt, people decided that the only thing better than one kind of fried chicken leg, was two kinds of fried chicken leg. It’s hard to argue.

As you’ll see in the video, I like to lay out my pork slices so that the larger slices will be in the middle of the skewer, and smaller pieces at the bottom, to maximize the drumstick effect.  Of course, I guess you could poke the pork in any old order, but there just won’t be as many oohs and ahs.

I used pork tenderloin, which is fantastic for this procedure, but traditionally pork shoulder trimmings are used. Regardless of what you make this with (just please don’t use chicken), I hope you give this American classic a try soon. Enjoy!


Ingredients for 6 City Chicken drumsticks:
1 whole trimmed pork tenderloin (not loin), sliced as shown
6 bamboo skewers (6-inch are best)
salt and freshly ground black pepper to taste
cayenne to taste
dried thyme to taste
flour, beaten eggs, and panko breadcrumbs as needed
vegetable oil for frying

The Great Flank Steak Roulade Experiment

I don’t remember exactly why, but for the longest time I’ve wanted to try stuffing and braising a beef flank steak, and this very brociale-like roulade was the result. And while the outside was an unsightly mess of frayed meat fiber, the overall dish was a delicious success.

Braising a flank steak seems counterintuitive since it’s almost always cooked briefly and served medium-rare, but so is top-sirloin, and I’ve used that cut for beef roulade before, and it worked fine. Flank steak is also one of the “beefiest” cuts on a cow, and has a decent amount of fat, so I felt pretty confident going in.

The only thing I hadn’t considered was the appearance, and that ended up being my only real complaint. Because flank steak has such large, pronounced meat fibers, after a few hours of simmering, my roulade had a bad case of split ends. As I mention in the video, we may try and wrap the meat with some type of protective layer, and by protective, I mean fatty.

Other than that, it was a fairly straightforward procedure. Feel free to stuff with anything you like (just not too much), and the same goes for the braising liquid. No matter what you decide to simmer this in, once you’re done, simply reduce it, and use it as a sauce. That means be careful with the salt. I generously salted the roulade, so I didn’t need to heavily season the braising liquid as well. Best to adjust that later.

Anyway, whether you use my specific ingredients or not, I hope you give this technique a try soon. All you need is a flank steak, a sharp, thin knife, and you’re ready to roll. Enjoy!


Ingredients:
1 trimmed beef flank steak, butterflied, and pounded flat (please note: you must cut and roll the meat in the exact way shown, so the grain is going the right way for slicing!)
salt and pepper to taste
1 tbsp black currants
1/4 cup plain breadcrumbs
2 tbsp chopped Italian parsley
1 ounce pancetta, slice into thin strips
2 tbsp finely-grated Parmigiano-Reggiano cheese
For the braising liquid, I used:
3/4 cup white wine
3 cups tomato sauce
2 cups chicken broth
1 bay leaf
enough water to just cover

Blog Archive