Showing off Angela

Happy Friday to you all! Whoot! Any fun plans this holiday weekend? I’m hoping to get to the pool one last time and get some more done in the family room. Otherwise nothing big planned here. 

Today I’m sharing a blogger who is actually a friend of mine – and the funny thing is we live near each other have some mutual friends but only met when we attended a paint workshop together years ago.

It’s so nice to have friends close by who you can talk “blog” with sometimes. :) Angela’s blog is called Unexpected Elegance and her home is beeeautiful. I think you’ll agree. She has mad decorating skills and makes it all look effortless.

Her kitchen (with pot filler!) is so pretty and classic:

pot filler above oven

And I just noticed we have the same chandelier in our kitchens:

weathered table and chairs

Told you she has good taste. ;) I love every single piece of decor in her home. Every one!

I love that Angela knows how to decorate but isn’t afraid to tackle DIY projects too. You may notice the door in the photo above. She took a regular hollow core door and made it into a Dutch door:

DIY dutch door

THAT is the kind of stuff I love. Taking what you have and making it an interesting and unique spot in your home.

She uses a lot of vintage finds in her home – she used to sell painted furniture and decor and I ALWAYS found something I had to have at her booth. I love how she used a barn door and some old legs to make this pretty table in her mud room:

stacking washer and dryer

She made a small area work really well when she made over that space.

So this one was one of the coolest ideas I’ve seen yet – creating that vintage stamped look on wood by using wax paper

wax paper transfer unexepected elegance

It makes sense when you go read and it is WAY easier than trying to paint all the words. Brilliant!!

Angela’s style is soft and light with lot of wood tones and it works so well together. Not only is her dining room table beautifully styled, but she made it herself:

DIY zinc table

She used a beautiful old base and then made her own zinc tabletop. It is SO cool. I’m not sure I’d have to guts to tackle that one but it looks so good I’d consider it. ;) 

Lovely right? You can see more of Angela’s beautiful home here. It will be great reading while you relax this holiday weekend – I hope there’s some relaxing in there for all of you!

Have a great one and I’ll see you next week!

National Toasted Marshmallow Day Eve

As everyone knows, tomorrow is National Toasted Marshmallow Day, and while I’ve never done an actual toasted marshmallow video (because that would be ridiculous), I do have something even better to celebrate with...this s’more ice cream pie! Not only is this very easy to make, and a proven crowd-pleaser, but just think of all the money you’ll save on sticks. Follow this link to read the original post. Enjoy!

Simple decorating

Hello there! I got to thinking after my last post about the trip to Better Homes and Gardens -- how one of the editors made things look so effortless. She threw together a few different centerpiece ideas for us in minutes, just using regular plates and items from the store and nature. Fruit and pinecones showed up a lot. :)

Simple decor really resonates with me – it’s one of the reasons I write this blog. A lot of the DIY projects I do are hard work and take some skill, but most of the decor in our home is simple and quick. It doesn’t need to take a lot of money or time to make pretty little spots around your home! I took a look around the family room and kitchen to share a few of my favorite simple ideas.

I get comments on my corks and candle often: 

simple decorating -- corks around candle

The vase was from HomeGoods (but I’ve also purchased similar containers at Goodwill) and I just plopped a candle inside and filled around it with wine corks. I didn't drink all that wine – just some. ;) I bought a bunch of the corks off Ebay a long time ago and still have some to play with.

If you follow me on Instagram you saw this one recently: 

simple decorating -- plants in pitchers

The vintage pitchers were $15 for the set at a local antique shop – I stuffed some plastic shopping bags down inside the bigger two and then placed the plants in. The small one holds an air plant. I LOVE the combo of the white and green! As I type this I’m noticing that most of these examples have green in them. Interesting. It gives a room life for sure!

I saw this simple idea on a blog and can’t remember which one it is! I’ve had the vintage baguette tray hanging on the wall for years and never really loved it there. The fake apples were sitting in a basket above the cabinets. Together it’s totally cute and EASY: 

simple decorating -- apples on tray

I don’t know where I got those apples but I’ve had them forever. They are SO REAL looking. They’re heaving like real apples too. They fool everybody. And you don’t need a vintage anything – a wood tray lined up with them would look just as pretty.

I love our pantry area – as you can tell I love to put plants in things other than just pots. I think it adds some interest – this one is a old crock:

simple decor -- boxwood wreath

And I hung that boxwood wreath up last spring and it’s never come down! I just wrapped some burlap around it to hang it and then nailed that into the top of the door. Bonus is that it works for Christmas too. ;)

All of these are easy and quick! To me it’s about looking at things in a different way – and taking inspiration from blogs. ;) Do you have any simple decorating tricks? Feel free to link some if you’d like.

**To find more info on the pantry door, go here.

Coq Au Vin – Rock Out with Your Coq Out

Some recipes just shouldn’t be translated to English. It’s not that telling your guests they’re having “Cock with Wine,” sounds so bad, it’s just that after dinner I want them tweeting about how great the dish tasted, not how funny/inappropriate the name was.

 The other issue would be one of false advertising, since I have no idea where you get an old rooster these days. I like to use bone-in, skin-on chicken thighs instead, which I think work perfectly here. Like all braised dishes, tougher cuts with lots of connective tissue work best, and on a chicken that would be the thigh/leg section.

Of course, someone will ask if they can use chicken breasts, and technically you can, but please don’t. They just will not add that sticky goodness to the braising liquid that the thighs will.

This really is a simple recipe, and all gets done in one pan, but there are several steps, as you build up fond after fond. Before any wine or stock hits the pan, we want a thick, gorgeous layer of caramelization, which is where much of this recipe’s flavor comes from.

I don’t want to sound cocky, but this really was delicious, and as I say in the video, the mushroom, bacon, and onion mixture alone is worth making this for. I hope you give it a try soon. And please, use the French name. Enjoy!


Ingredients for 2 large portions:
8 oz sliced bacon
6 bone-in, skin-on chicken thighs
salt and pepper to taste
*note: after cooking bacon and browning chicken, discard all but 1 tbsp of the fat before cooking the vegetables
2 shallots, sliced
1/2 large yellow onion, diced (traditionally they use pearl onions)
10 large button mushrooms, quartered
2 tsp butter
2 tsp flour
1 1/2 cups red wine
1 cup chicken broth
6 springs thyme
- Braise for about 1 hour 375, or until the thighs are tender

Better Homes and Gardens tour

Hello all! Oh my goodness, I have been so excited to tell you about the trip I took a couple weeks ago. I was approached by Better Homes and Gardens recently asking if I wanted to help promote their products at Walmart and then TAKE A TRIP TO THE BHG HEADQUARTERS.

Uh. Yes, I would like to take a trip to the Better Homes and Gardens headquarters, thank you very much. It is an honor and I’m so excited about this partnership:

Network-Badge-300x298

I took a TON of pictures and this is only half of them – but still a lot of pics! The headquarters are located in Des Moines Iowa – which is really weird because the only two times I’ve stayed in Iowa in my life were this summer.

They truly went all out for us:

BHG bloggers

We got to see so many of their current and future products and in addition got a grand tour of the facilities. It was so fun.

Nancy Hopkins, the food and entertaining editor, gave us a beautiful presentation in one of their test kitchens:

BHG headquarters

Do you see the cutie fall cookie jars? Adorable. They’ll be out in stores soon. :)

Nancy did the easiest, most beautiful entertaining displays using basic dishes and food. It was so simple, seriously. I think we way over think things when it comes to decorating sometimes. The simplest are often the prettiest:

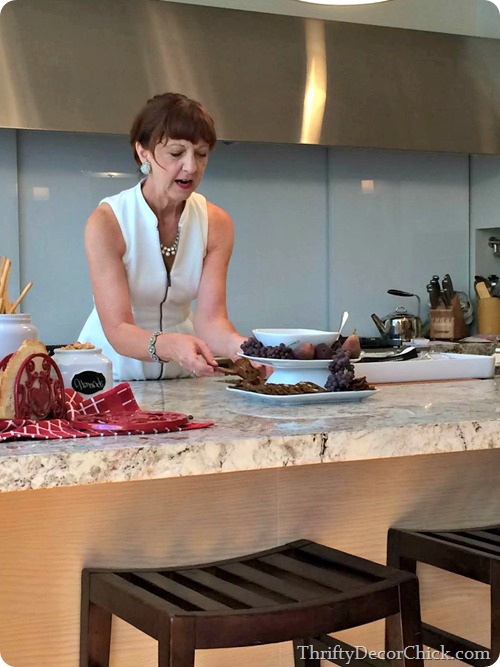
That was a plate, an upside down bowl and then another stacked on top. (She suggested using something like Velcro to make them stay put when entertaining.)

We got a peek at the fall and holiday products that will be in stores soon:

BHG Christmas products

We also got a tour through the test kitchens – it smelled AMAZING:

BHG test kitchen

What’s funny is they were making this shrimp and pesto meal and Christmas cookies – and the combo still worked. ;)

One of the most exciting parts of the tour for us bloggers was seeing where the shoot spreads and advertisements for the magazine. Rooms were built everywhere with fake window and “natural” light. You can’t even tell they weren’t real!:


And we got to tour the prop room. People. We could have spent hours in there poking around – it was crazy!:

BHG headquarters

And really, so well organized too. Everything down to the cutlery was organized by color. So cool.

We got to see some photo shoots in action too. We walked in to one and the space was so dark, I didn’t think there was any way they would get a good shot:

But the images were coming up on the monitor and were stunning. It was fascinating to watch!

One of my favorite areas was the workshop:

Gah. This girl was in heaven! It smelled so good in there too. Pesto and wood – good smells. ;)

They had a room filled with just walls – exterior and interior. My favorite was the board and batten wall:

There’s a planked on there in the back too. ;) The exterior walls even had lights and doors, it was so cool.

The part of the tour I was most looking forward to was the test garden and it did not disappoint!:

BHG test garden

This is another spot I could have walked around in forever. It was beautiful:

lily pads

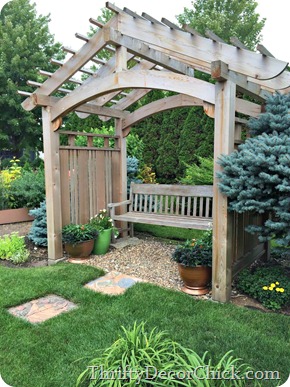
I think the shade garden was my favorite. I want to create one in our backyard just like this:

shade garden

Easy, right? I love that they use this garden to see what plants work – how well they grow, what kind of light they need. I’ve become a bit of a gardening nut over the past few years so I was all geeked out. :)

We finished up the day with a trip to the Iowa State Fair – we had dinner and then had a couple hours to play:

Iowa state fair

We rode a bunch of rides and had an absolute blast.

I have to tell you, I was SO impressed with the products – I was surprised more than once at what was available and the price. This bedding was one of my favorites:

colorful bedding

I don’t know why but I was obsessed with it. I just think it is so pretty – perfect for a girl’s room. Or an adult girl’s room. ;) I LOVE all the colors. OH and the headboard – (with nail head trim!) starts at $150 and comes in two different colors!

I was so, so impressed with their lighting. I bought a very similar lamp for NOT $60 a couple years ago:

Here is the wood one and I believe the swing arm lamp will be coming out soon.

Their weathered wood pieces had us all excited – they look SO good and this finish is so popular right now:

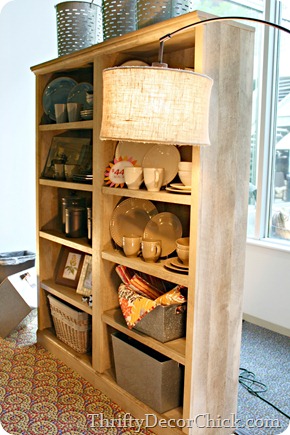
That console on the left is really for TV components but I loved it as a sofa table – or in a dining room as a buffet.

Their slip covered sofas and chairs were comfy and didn’t have that slipcovered look at all – I didn’t believe them at first. ;)

fish pillow

And I wouldn’t think I would like a fish pillow but those looked pretty adorable.

Their dishes were gorgeous (very Pottery Barn-like) and that little tray in the middle with the candles was so versatile:

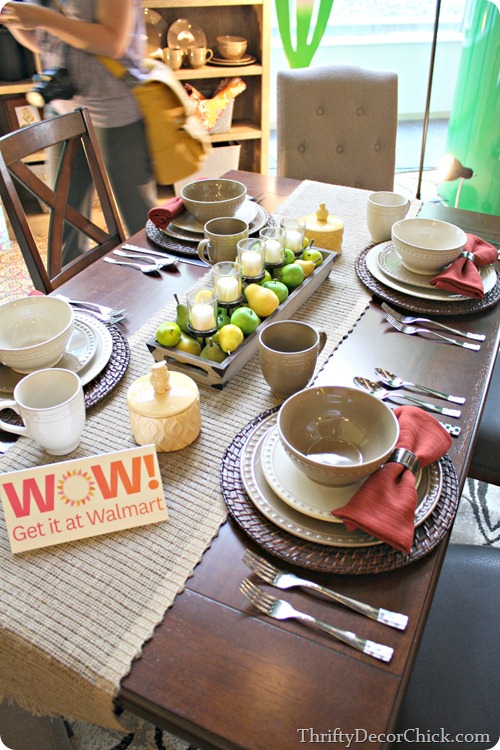
It would be so easy to decorate your table for the fall or Christmas with that! I can’t find it online but I’ll do some checking and see if I can find it.

Talk about knocking one off the bucket list! It was an absolute honor to be invited and they treated us so well. I can’t wait to show you more of the products in a couple months! If you want a link for anything you see here just let me know. :)


I received compensation from  BHG at Walmart for my time and participation in the BHG Live Better Network. All experiences and opinions are my own. :)

Bread & Butter Pickles – One of the Great Depression’s Greatest Hits

During the Great Depression, sandwiches weren’t quite what they are today. Forget about choice of aioli, or did you want roast tri tip or smoked turkey; back then it was more like, “Did you want cucumbers in your sandwich, or nothing in your sandwich?” Okay, cucumbers it is.

At the end of summer, the excess "cuc" crop was sliced, salted, pickled, and put up in jars for the cold, lean months ahead. If you thought summer Depression-era sandwiches sucked, it was much worse in winter, when you couldn’t even find a bland vegetable to slap between your slices of buttered bread.

I can just imagine what a treat it must have been to fill a sandwich with these sweet crunchy coins, or "bread and butter pickles," as they came to be known. I’m sure it was a wonderful break from what must have been a fairly flavorless existence. Happily, times are a bit better now, and we only make these because they taste really good.

So, make a batch, experience a little piece of American culinary history, and as you’re tossing them on that burger, think back to what those days must have been like. I mean, especially with no YouTube! I hope you give these bread & butter pickles  a try soon. Enjoy!


Ingredients for about 2 pints:
2 lbs pickling or other firm, little cucumbers
1/2 yellow onion, sliced
2 red jalapeno pepper, sliced
3 tbsp kosher salt
2 cups sugar
2 cups white distilled vinegar
1/4 cup water
1 tbsp mustard seeds
1 teaspoon celery seeds
1/8 tsp ground cloves
1/2 teaspoon turmeric
1 tsp black peppercorns
2 cloves garlic, sliced

It’s time for some board and batten

Hey heeeey! Hope your weekend was great!

I got SO MUCH DONE in the family room over the weekend – so much that I’m crazy sore today. Me thinks I’m getting too old for the days of nonstop DIY. We’ve been living with our family room half way done for a couple weeks now – I’ve gotten very little done up till now. I was out of town for a trip three days, then I was sick for most of last week with a crappy cold. I didn’t feel like doing anything.

Yesterday was the first day I felt good and had a mostly free day to get things done. I can live with half way for a while – then all the sudden I can’t handle it one. more. day. and I go into beast mode. There’s something about this time of year – I want to NEST like you wouldn’t believe. I want to decrapify my entire house, fluff everything, start thinking about fall decor…all that stuff. And none of that is happening if I have the family room taunting me. :)

There’s so much for me to do in the room, it can become overwhelming. So I’ve been focusing on a few walls at a time. I painted the walls in one end of the room already and I’m still patching some of the board and batten and touching up paint there. But the biggest area that’s been bugging me is this side of the room:

It was really a mess, as you can see. My first plan of action yesterday was to finish up extending the crown molding. This is a little trick I use to make the crown appear thicker. You all know how I love me some chunky trim!

I’ve seen a method where they attach baseboards to the wall, I think upside down? And then you install the crown over it. A few things though – I already had the crown up in the room, so I’m not taking it down just to put it back up. Also, that’s a BIG added expense in a room this size. Third – I had already done this trick in the office so I needed to continue in throughout the space anyway. :)

It’s quite easy – it just takes a lot of trips up and down the ladder. (I should have legs of steel at this point, really.) I use this inexpensive decorative trim:

beefing up crown moldingYou can find it at Lowe’s and Home Depot. I just place it about an inch below the current crown. You can use a piece of wood or something as a spacer so you have the same distance around the room – I just use my level as I go around so it’s fairly consistent.

The great thing about working so high up is when you cut the piece too short for the third time and just put it up anyway cause it’s making you cuss, nobody will know:

DIY thick crown molding

Caulk and spackle people. Caulk and spackle.

It took three coats of semi gloss white (legs of steel) until it was covered, but it looks so good! Chunky!:

making crown molding look thicker

The day we tore down the wall one of the guys mentioned how I was going to have to redo all the crown in the family room to match up with the office because I had used the baseboards underneath. It fooled him, it will fool others. ;)

So I mentioned I was in beast mode yesterday and this is where the rest of the work came in. Here’s a shot of this wall just after I finished installing the small trim:

It hadn’t been painted yet, obviously. We had to patch a few holes from the TV hanging there before and the darker rectangles on the wall were from the molding I had had up there forever. Nearly eight years – I’ve been ready for a change for awhile.

After caulking the baseboards in three places, painting them, painting the bottom part of the wall three times in semi gloss white, installing all the board and batten and most of the decorative trim, finishing up the crown and painting the walls their new color, I ended up with this:

white board and batten

And I LOVE IT. Whoa, I LOVE how the white looks against our floors and the furniture. Yummy.

OK, so this spot is still far from done. I still need to finish that small decorative trim at the top of the board and batten – I ran out:

The door trim in the background still needs to be finished and painted. And the biggest thing is caulking and painting all the boards on the wall.

But it’s closer and it looks SO much better so I’m celebrating that!:

long table world market

I’m trying not to think much about the decor just yet – but the accessories will change up on that table. It’s a bit too neutral for me. And I want to paint that mirror a fun color, I just have no idea what it will be. :)

But the wall looks a ton better and I’m SO excited about the direction of this room. I still need to patch a few spots on the other wall, finish up the board and batten on the other side of the room (there’s not much) and then I’m putting all of my attention on the fireplace. I want this space done by the end of September – that’s my goal. Sooner would be awesome!

**To see my how to install the board and batten look, go here.
**For more about that awesome table and where it used to sit go here. :)

Next Up: Bread & Butter Pickles


CUSHION COVERS AVAILABLE AT FANCY HOME DECOR*


Unaweza ku match na mapazia yako, makochi, wall paint, carpet au decor nyingine sebuleni kwako....

Price: 15,000/= per cushion cover

Call +255 0712 023102


Blog Archive