January before and after link up!

Hello there from icy Indiana! I was thinking school days would get back to normal this week, but not quite yet. :) How is your weather?

I totally and completely spaced it on the before and after party last Monday. Duh. Didn’t even realize it till days later so we’re just going ahead with it today, OK? There were SO many great projects linked up last month, yet again I had a hard time picking just a few to share with you today.

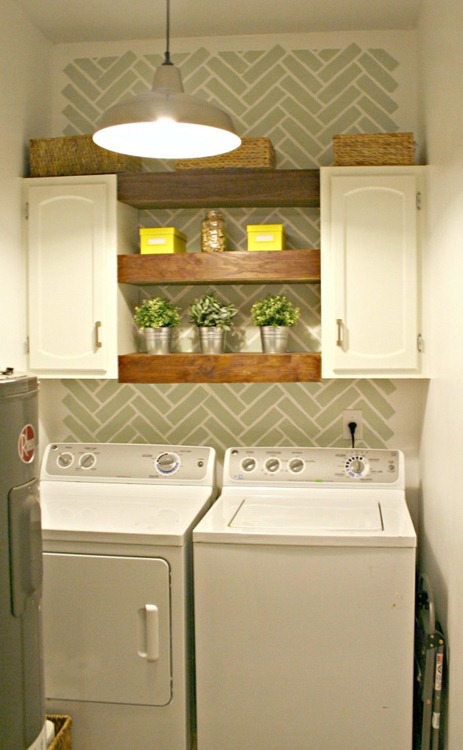
I absolutely LOVE Heather’s laundry room makeover:

simple laundry room makeover

The changes were simple and inexpensive and they make a huge difference! Those chunky wood shelves are my favorite. I’ve been planning to build shelves between our cabinets in the laundry room as well and now I’m leaning toward stained instead of painted.

This bedroom makeover by Pam is absolutely stunning:

light bedroom with coralJust gorgeous, right? And the bed is in front of the windows – don’t be afraid to try that out if you have an awkward space!

It’s January and we’ve got organizing on the mind so I had to share Ronda’s DIY closet storage:

DIY shoe storage for closetIt’s so simple – I need to add some additional shoe storage in our closet as well and this is great inspiration. I like how you can make it custom to your shoes too.

I loved Denise’s solution to the box of fluorescent lights that used to hang in her kitchen:

filling in fluorescent lighting holeIt looks so good! So much easier than tearing down the remaining ceiling or filling in that spot. Love it!

Haeley shared their new man cave space and I love that dark gray:

man cave dark grayIt’s a tiny room but they made the space work really well. And what more does one need in a man cave but a comfy chair and a TV? That’s all I’d need! And wine. (But they have that too.)

I loved Jennifer’s post because I love seeing how products like this work. She painted her appliances with a special paint to make them look stainless:

stainless steel paint

I have to say I’m really impressed!! We thought mixing black and stainless would be “cool” when we built years ago – now I just find it “annoying.” This stuff looks pretty amazing and I may have to try it out on our trash compactor.

OK, Julie’s bathroom is gorgeous as it is, but her DIY roman shade took it to a whole new level:

DIY greek key roman shade

I LOVE this because a roman shade like this would cost so much money to have someone else do it! It looks fantastic!

Wow, told you – great projects!! Can’t see to see your recent projects to kick off 2015!

If you’d like to be considered for next month’s roundup, please add a link to TDC in your post or add this code:

<div align="center"><a href="http://www.thriftydecorchick.blogspot.com/" title="TDC Before and After" target="_blank"><img src="http://www.homestoriesatoz.com/wp-content/uploads/2012/03/beforeAndAfterButton_thumb1.gif" alt="TDC Before and After" style="border:none;" /></a></div>


Now let’s see what you’ve been up to recently:


Bluetons (Blue Cheese Croutons) – Trademark Pending

As promised, here are the blue cheese croutons you saw floating on top of the roasted apple and parsnip soup we posted yesterday. They were just perfect together, and as I ate my soup, dozens of other, “perfect togethers,” easily came to mind.

We only use three ingredients here, which is why this works so well. Try to resist the temptation to add salt, pepper, or other spices, as the blue cheese will provide all the punch you need. We’re going for pure blue cheese flavor in a buttery, crunchy package, and anything else would just get in the way.

Another tip here is to use bread that’s not too stale. I find that dry bread makes a crispy-hard crouton; verses fresher bread, which has more crispy-brittle texture. You can file that one under theories I can’t prove, but don’t need to.

The type of blue cheese really doesn’t matter to the technique, but the sharper, and more intense the flavor, the better. Like I always say, you're the boss, so use whatever you like. Speaking of which, Michele gets credit for the, "Louis Vuitton of your blue cheese crouton" line. I was going to go with "the Chef John of..." but hers was much better.

I guessed at some amounts below, but you don’t need those, since this is simply as much butter and cheese as you feel comfortable with. I hope you give these blue cheese croutons a try soon. Enjoy!


Ingredients for 8 portions Blue Cheese Croutons:
1/2 loaf fresh or day old bread (try to use something not already dry and hard)
5-6 tbsp hot melted unsalted butter
2-3 ounces strong blue cheese, placed in freezer until firm
*bake at 350 F. until browned and crisp. 

The kitchen redo plan

Hey hey and happy Friday!! This week was weird (in a good way) with school delays and cancellations so I will be back to posting a little earlier in the day next week. I still haven’t gotten back in the groove just yet!

I’m back today to share the initial plans for a project I’ve been waiting YEARS to start. I waited because I wasn’t 100 percent sure what I wanted to do in this room till last year and I have to know my direction before I start. I’ve seriously been planning to redo our kitchen for the longest time and I’m determined to get going this year.

I want to do most of it myself…there are a few things that I may need help with, but for the most part I think I can handle it. We shall see. :) I’m sharing photos of our kitchen as is to share the plans – but it’s been in a bit of a half-way point for awhile so ignore the stuff like missing baseboard and the wonky island:

The island looks like that because it was torn apart to remove it during our renovation. I had it pulled up so we could patch the floor underneath (we had the hardwoods installed around it years back) – this allowed us to move it a little further away from the fridge and quite a bit back from the sink and stove.

I want to extend the island so I wanted to make sure we’d have plenty of room to move around the stove with the door open. I shared the plans for the island before, but the basic idea is to make it quite a bit longer and build out the front just a bit:

large kitchen island

It won’t be THAT big, but it will probably be nearly double the current length and a bit wider too. I plan to do a stone countertop on there and I think I’ve found what I want – but I haven’t looked that much yet so that could change. It will be a light stone for sure.

I also plan to remove the upper microwave and install it in the island:

microwave in island

(source)

I don’t know if I’ll do it like that (one that you just slide in) or a built in one – the built ins are SO expensive, so I’m guessing it will be the former.

This view has changed a bit recently:

bay window in kitchen

You can see I still have to paint the ceiling patches. So much to do!

This is where the back door used to be. The trim still needs to be painted, I’ll do my craftsman trim around the pantry door and built a window seat in the bay window:

window seat bay window

(source)

I talked about my excitement for that project here. :) I think it will be lovely!

This is the view that will undergo a dramatic change:

beadboard backsplash

The upper cabinets and microwave will go and will be replaced with a hood and shelving.

I know some consider the shelves to be trendy but I think they are timeless – and more efficient honestly. I cannot wait! I love the look of thick wood shelves:

wood shelves around window in kitchen

(source)

The backsplash will change too. The beadboard backsplash has held up incredibly well – I’ve actually been quite impressed with it. But I’ll be doing something different because it stops where the cabinets are installed and I just want a different look. It will be tile but I’m not sure about what yet.

I’m most anxious about the backsplash. I can tile just fine, it’s removing the beadboard that will be an complete and utter disaster. It’s installed on top of the old backsplash tile because that tile was impossible to remove – so there will be a lot of drywall repairs I’m sure. :)

These cabinets will stay:

BUT they will get major updates too. Yes, I’ll be painting them. I know, I know, some of you hate that but they are nearly 11 years old and showing their age. The stain is worn off on spots on all of the base cabinets – not so much on the uppers. The little stain marker they gave us when we moved in doesn’t cut it to fix them. ;) I’m quite sure the paint on these will be the biggest difference in this room – I think they will be beautiful!

But the bigger reason for painting them is my plan to extend them to the ceiling like so:

build up cabinets to ceiling

(source)

Ours will go all the way to the ceiling and will be open like those above. I would love to put some kind of lighting in them too. Our uppers are the standard size and I used to kick myself for not doing the taller ones, but then I realize my friends with taller ones need a step stool to use the extra shelf, so it doesn’t bother me as much anymore.

I still have to figure out measurements but the new section will probably be about 14-16 inches tall and then I’ll add a header with crown to fill in the rest. Those will just hold decorative items. Another BIG job but it will make a huge difference!

I also plan to build in our fridge with a new upper cabinet and wood on the left side:

build fridge enclosure

(source)

And instead of our corner appliance cabinet I’d like to build in something like this next to the fridge:

appliance cabinet

(source)

That’s definitely something I’d need help with though.

The plan right now is to do butcher block countertops everywhere here to save money. Like I mentioned before I still haven’t decided on the stone I want to use on the island so if it’s not crazy expensive I may flip that and do the stone on the counters and wood on the island again. Not sure yet.

That’s the plan as it is right now and I’m so VERY excited! There’s one more possible project I’d like to tackle but I’ll hold that for later – if we decide to do it. It would just offer more storage in the kitchen overall.

I don’t know if we’ll be able to do all of this this year but that’s my goal. I’d love love love to have a pretty new kitchen by the holidays. Have you tackled a kitchen renovation? Feel free to share anything worthwhile you learned along the way! 

Have a great weekend!!
The matter of clutter

So I know I touched on dealing with clutter earlier this week but it’s on my brain for many reasons today. I always talk about ways to deal with the clutter…but I rarely talk about why it happens in the first place.

I posted this article on Facebook yesterday and really enjoyed reading your responses. I find this kind of stuff fascinating – psych was my minor in college because I’m always overly curious as to why we do what we do. The article focuses on a study that correlates clutter and depression in women and I found it really interesting.

I’m never a black and white person so I wouldn’t ever go so far as to say this is always the case, but after reading it it was kind of a “duh” moment for me. It is SO me. The article also mentions that men are not nearly as affected by the things around our house as women are, which again…for the most part I believe.

It got me thinking…if we allow clutter in our homes, why? If we don’t (and I find those that don’t are dedicated to avoiding it every day), what was it that made it unbearable for them?

I’m mixing in some organized spaces throughout to give us some motivation. ;)

As I was reading the comments on Facebook I was struck with a few things about myself. First of all, as with so many things, I think the reason we do what we do is borne out of how we grew up. There is still a deep, internal struggle I go through when I declutter because of that.

replacing wire shelves in pantry

(Replacing wire shelves in pantry)

It feels wasteful for me to get rid of things I bought…no matter when I bought them and how often I use them. We you don’t have a lot growing up it sticks with you. I’m a bagger, as I’ve mentioned before, and I will have things in bags for months and never need one thing in there. And I’ll still go through each and every item – when if I’m honest with myself I don’t need any of it after all that time.

I also don’t have many things from my childhood – the only items salvaged are photos and a few other items. So I tend to hold on to many things for ALL of us so that we’ll “keep” the memories.

organized linen closet

(Organized linen closet)

I had to laugh because I was watching The Goldbergs last night, which is my favorite show and last night’s was stellar because it was about New Kids on the Block, but I digress. The rest of the story line was about how the mom had kept literally every single art project and drawing from her children over the years and couldn’t part with them. It was to the extreme but I identified with her.

The best part though was when she showed her husband a drawing of her son did with his hand – and how there was no possible way she could ever get rid of it. And the dad said something like, “well he still has a hand!” It’s a goofy sitcom but his response stuck with me.

I struggle with the difference between memories and needing to keep things in order to remember. I think as moms we all want to keep every memory of those little hands…all 50 drawings of them. ;)

DIY laundry chute

(DIY laundry chute)

But I write a lot down and we have a crap load of pictures so do I need every single drawing? Probably not. Is it OK to keep some? Yes.

My other reason that I’m not always on top of clutter around our house is that I’m the only one here fighting the good fight. My husband is completely, totally oblivious to it. Completely. And honestly, I am to a point. That’s where the article comes in – I always feel better with less clutter around our house. Always. But I can deal with it to a degree. I have a fairly high threshold. ;)

I get to that threshold though and seriously feel like I’m going to lose it if it’s not gone right that second. I have cried because of clutter. I sat in our newly organized master closet yesterday with my husband’s clothes piled on the floor and was so overwhelmed I had to walk out.

diy pull out drawer

(DIY rolling drawer)

He didn’t do it to be disrespectful – he was going through clothes to wash. But I could feel my blood pressure rising while sitting in that room.

We’re both creative types and for us clutter isn’t always a big deal – but even when I’m not overwhelmed by it I’m annoyed by it. My husband is never annoyed by it. But if I’m being honest here…he’s not the one cluttering up our house. It’s me. And if he attempted to organize the clutter I’d probably stress even more…so there. you. go.

I don’t make resolutions but I always focus on cleaning out our house this time of year and I DO love the feeling. It is freeing and light and truly amazing. I have a lot more to go through yet and I’m actually looking forward to it. It is hard for me to let go of things but I can count on one hand all of the things I regretted donating. And that wasn’t for emotional reasons, it was purely a “oh I could have used that thing for this” reason.

organized coat closest

(Organized coat closet)

I have made a vow to myself to stay on top of the clutter more this year than I ever have before. I focus on projects around the house so much I don’t focus on the little things like the kitchen island piling up with crap. But I’m realizing those “little things” become big things and weigh me down emotionally.

I would never go so far as to say clutter makes me depressed, but I can certainly see how it could cause that. And clutter is a crazy thing – the more it builds up the less we want to deal with it. It can paralyze us.

DIY utensil organization

(Simple utensil organization)

Do you identify with any of this as well? Of course the opposite is true for so many – they grew up in a home with a lot of clutter so they absolutely cannot handle it and stay on top of it. OR they grew up in a home that was free of a lot of stuff and they continue the same in their house. I admire that – I want to do the same.

I do want to find a good balance. I don’t think it’s wrong to want to keep the kid’s drawings and the birthday cards with sweet messages from ten years ago. I just think I need to be a little more selective. And this post may sound like I’m Beverly Goldberg and I’m not. ;) For the most part our house is organized and functions well.

Does the clutter in the house affect your mood? Do you stay on top of it daily or can you let it sit like me? And was your childhood home the same?

Roasted Apple and Parsnip Soup – A Creamy Lesson in Seasoning

Besides being a delicious and comforting winter meal, this roasted apple and parsnip soup is great for honing your seasoning skills. With its mild, earthy, slightly sweet, gently aromatic flavor, it’s the perfect vehicle for tasting the effects of salt on food.

As I mentioned in the video, most “bad” soups are the result of under-seasoning. Nothing makes me sadder than reading an online recipe review, where someone is complaining that a soup recipe was too bland. Hey, Captain “Two Stars,” did ya' ever think about putting a little more salt in?

When you make this, salt the vegetables when you roast them, but then wait until the soup is done before adding any more. Once the soup is finished, and you’ve achieved your desired texture, then taste and add salt, a pinch at a time. As you do, take a minute in between samples, along with a sip of water, and you’ll really notice how small additions of salt amplify the flavors. Continue until it sings.

Speaking of seasoning, one reason I chose blue cheese croutons for the garnish was their sharp, salty finish, and it was a beautiful combination. I look forward to showing you how to make those in the next video. Stay tuned for that, and in the meantime, I hope you give this delicious roasted apple and parsnip soup try soon.  Enjoy!


Ingredients for 6 Portions:
2 lbs parsnips, peeled, cut into 1/2-inch sticks
2 green apples, peeled, cut in thick slices
Note: a diced yellow onion could be added to the roasted vegetables. I didn’t want this too sweet, so I tried without one, and it was amazing, but I'll try the next batch with that addition.
2 tbsp olive oil
salt to taste
1 russet potato, peeled, cut in 8 pieces
6 cups chicken broth (or combo with water)
1/2 cup heavy cream
pinch of cayenne
- Garnish with croutons, crumbled blue cheese, and chives

Cauliflower!!!!!

When was the last time you were really excited about cauliflower in a recipe? Never? That is correct. We would have also accepted, “Are you kidding?” and, “What?” However, my friend Carl Hanson put together a great collection called, “Undercover Cauliflower…Dressed Up In 10 Delicious Disguises,” which may change all that.

Several of these ideas, including our own Cauliflower Pizza Crust, could generate actual excitement, or at the very least a raised eyebrow. If you think your heart can handle it, click here and all will be revealed. Enjoy!

I could live here

Hey there – sorry for the late post again today. Our break is still lingering in the form of lots of snow and frigid temps so we had a delay this morning. I will miss the relaxing weeks of the holidays but I’m kind of ready to get back to a schedule!

Today we’re going to dream and drool over some beautiful photos. I’ve shared the HGTV dream home before and honestly wasn’t that excited about it – but this one. THIS ONE is gorgeous. Holy cats, it’s just so well done. There’s not much I don’t like about it so I had to share.

It’s a Cape Cod house and I love this style:

cape cod hgtv home

The inside is so fresh and pretty – and the style is just what I would expect from the exterior:

hgtv home 2015

Beadboard EVERYWHERE! And it works here. I still don’t think I could do all white walls but it really is a lovely backdrop:

beadboard walls with trim

Love the sconces throughout too. I want sconces everywhere.

I like how they broke up the beadboard with trim – it makes it look even more expensive:

hgtv dream home cape cod

They really did use it everywhere…but I love the dark backs on the built ins:

gray back on bookcases

Using a contrasting color on the backs of bookshelves or built ins really makes everything else pop! Love the simple accessorizing too. Makes me want to take half the stuff off my shelves. :)

You can see here how the paneling really does go all over. The beams are gorgeous, yes? I was surprised to see that the dining area really isn’t that big – the size comes from the ceilings. When I watched on TV it looked like there wasn’t much walking space behind the chairs. This is what I think we’ll see more of – less formal dining rooms and more dining spaces incorporated into the rest of the living areas:

paneled ceiling wood beams

The kitchen isn’t massive either – I mean, it’s not tiny for sure but not crazy big. It is a lovely room!:

dh2015_kitchen_01_hero-shot_h.jpg.rend.hgtvcom.1280.853

Of course, the butcher block island is my favorite part. :) Love this view:

butcher block island

The skylight helps to keep things open and bright in there too.

I wasn’t as crazy about the bedrooms – but I am nuts about that master light fixture:

hgtv dream home

I like the wall color but think this room would look even more amazing with a lighter, more neutral tone. I mean, it’s stunning, come on. But the color is throwing me a bit.

I love the use of that color on the ceiling in the bathroom though:

painted aqua ceiling

Seriously, it’s huge! Party in the potty anyone? If I win you’re all invited. ;)

More beadboard throughout this space:

free standing tubIt really is a gorgeous home. I think this may be my favorite one they’ve done yet! The architecture is stunning and really the best part of this house I think. (You can see more of the house here.) Did you watch the show to see the whole space? It’s fun to dream right??

Blog Archive