Finished basement kitchenette

Hey hey! Well I’m getting things done this month, that is for sure. The no spend month is in high gear and I’m purging and organizing and getting little projects done like crazy. It feels GREAT! But I’m dying to go shopping. :) I usually don’t mind it but I haven’t stepped foot a “fun” store for more than a month now. Starting to twitch a little bit.

But did I mention I’m getting things done? I’ve had the materials for this project since two IKEA trips ago, which I’m figuring was about eight months ago. As usual, I am incredibly efficient and on top of things!

This was our little basement kitchenette last year:

stencil on gray wall

We had the cabinets installed and then I installed the countertop and painted the cabinets. Then I jazzed it all up with a fun stencil.

A few months later we had the sink installed and since then it’s been a really functional spot. Love it! I’ve always wanted storage up above but knew cabinets would feel too heavy and would block the lighting.

So I picked up these shelves and the EKBY BJÄRNUM brackets from IKEA awhile back. (Sorry, didn’t mean to shout those at you in caps, but I copied and pasted that from their site cause I’m not even trying to spell that.) I could have just used basic stained wood for the shelves but these were the exact color I wanted and they were done, which is nice once and awhile:

That’s actually one shelf – I cut it in half for this wall. So I only used two shelves total. The brackets were easy to install – some of them I got right into a stud:

installing ikea shelves

And for the others I had to use anchors:

EKBY BJÄRNUM brackets

You just install one side, then place the shelf and bracket on the other side, make sure it’s level and then mark where your anchors need to go. When you have the anchors in, put the shelf and bracket back up and then secure it to the wall. You have to insert the shelf first!

Funny thing was I’ve put this off forever and it took less than an hour to finish up. Typical! I wasn’t concerned about how strong they were because this one tested them out immediately:

Of course he did.

My original plan was to hang three on each side, but I thought that would get a little busy. We don’t need a ton down here – just a few plates and smaller items so the four hold everything perfectly!:

ikea wood shelves metal brackets

Here’s the basic sink we put in – it’s just a drop in but very deep. I gotta have a deep sink to hide the dirty dishes. ;) I went pretty basic with the faucet too and didn’t add a sprayer. Kinda wish I would have but we don’t use this sink a ton:

basement kitchenette sink

I was using what we had to fill the wall – the dishes were on clearance last year, the basket holds towels and washcloths, the ball jars serve as glasses and the sign above is one I made years ago:

ikea shelves metal brackets

It all came together just like I envisioned it!:

EKBY BJÄRNUM shelves

I may add a mirror to the middle to see how that looks. I don’t want it to get too busy so we’ll see about that.

Here it is with the lights off so you can see the stenciled wall a little better:

basement kitchenette shelving

We also have a small fridge and microwave down here in the stair storage. Someday I can see us adding to this spot and wrapping it around the corner to add a bar or something. For now that area to the right of the cabinets is the Bub’s indoor basketball “court” that he uses every day in the winter. :)

When he’s older we may expand it a bit. For now it’s a great little spot with everything we need for movie and laundry folding nights:

simple basement kitchenette

This basement is a dream come true – we absolutely LOVE it down there. And now that we have cold drinks and running water we can just hibernate (which we did a lot over Christmas break). By the way…pizza rolls are the BOMB in a toaster oven. Just sayin. Try it.

One project down, a million to go! :)

My tiniest (organized!) room

Well hello! I’m back to kick off January with a little purging and organizing. I introduced you to my favorite room in the house a couple years ago. It’s not what you would expect as a favorite, since half of it has cement walls:

basement storage room

That’s how it looked years back before everything was drywalled in. Considering I used to have all of this down there:

Getting down to this little 60-square-foot room was pretty fantastic.

It’s actually stayed fairly organized for the past couple of years. I think it was around when we started construction on taking down the wall in the family room that it became a complete and utter disaster area:

I show you this because I love you. Be kind.

This room serves a couple functions for us now – one is storage and one is the “cat” room. A couple of the litter boxes are in here. One is upstairs as well and that’s the only one they like to use but that’s a longer story.

I actually got all this done before Christmas. I was fed up with the space and a woman on a mission. The first thing I did was to take every single thing that was on the floor or stacked up on something out of the room:

basement storage

We keep our dehumidifier down hooked up to the sump pump but we turned it off some time ago because the sound of it was terrifying one of the cats. He’s heard it for literally years and all of the sudden…terrifying. So.

Also, we don’t use it in the winter anyway and we’ve been told a couple times it’s really not that necessary in our dry basement anyway. So it went to the under the stairs storage for now and that opened up quite a bit of room.

The biggest problem has been the paint. I haven’t gone through it in years and I didn’t have a great system set up. All of this was sitting on the floor in the room:

organizing paint cans

Most of those were on the floor because I had already decided to get rid of them. I just was too lazy to take them all upstairs? I guess? Who knows.

Even when it was fairly organized I would get frustrated finding a color I needed. So I grabbed some mailing labels we had:

And used them to label those that weren’t:

labeling paint cans

I put the room I used them in and how I used them too – ceiling paint, trim paint, whatever. What was funny is that for some of the colors I had to search my own blog to figure out how I used it. ;)

The paint area was a mess mostly because I just didn’t have enough room for everything. I had all the little sample and quart cans stacked with the bigger ones and it was a mess.

I had a few more of the metal brackets (super cheap) and grabbed the best piece of scrap wood I had from the basement. It was only a one by six (all the other shelves are at least one by ten) but it was just big enough to hold all the small cans:

DIY storage shelves

And obviously I got rid of a ton of stuff. I saw this years ago and try to keep it in mind when clearing out: decluttering mantraIt’s not a 100 percent for me, but pretty good advice. This goes for your closet too! What to do with the stuff is another question that I covered here – I do a mix of all of those things usually. It’s been awhile since I hosted a swap, I may have to do that again soon. :)

I’ve said it a million times but I’ll say it again…you waste money when you aren’t organized. I’ll be the first to admit that when my storage spaces become a mess I end up buying something again because I can’t find it. It’s such a waste and must be the reason I have approximately 12 tape measures.

As for the stuff still in the room – a lot of it is for future projects, a lot of it is just decorative stuff I actually use:

DIY storage shelving

The awesome part? I have empty space on nearly every shelf. Hopefully by the end of this no-spend month I’ll have more projects done and even more space!

One of my favorite tricks is to use the drapery tie backs as big hooks. I use them in our coat closet for bags and scarves and they work GREAT! I used to use these on every one of our windows but have since taken them all down – so I have a lot that I use this way:

big hooks for storage

And yes, I have a little lamp in here. Every room needs some low light. HA!

There you go – one space completely purged and organized! It feels so good!! I’ve moved on to other spaces and will share those as well. Are you feeling the decluttering bug right now? My goodness, when I have the time and patience to focus on it I love this process!

The finished basement

Hello and welcome to a new week! Let’s talk about the weather, shall we? Cause I’m annoyed. We’re supposed to hit 60 today and then have a chance of up to TEN INCHES of snow starting tomorrow night. I. give. up.

If it snows we’ll be down in our basement – our favorite place to be! We finished our basement two years ago (I can’t even believe it’s been that long) and I’ve been promising a recap post since then. I am superfast. :) I’m sharing some updated pics of the space throughout this post as well, since it’s been a while.

When we were talking about if we wanted to go ahead with finishing the basement (we had lived here eight years at the time) we were trying to decide how we would have it done. To get a basement finished in our area by a contractor it can cost up to 50 thousand dollars, depending on the finishes. Most estimates we heard were in the 20 to 30 thousand dollar range. Friends of ours had theirs done (it was a bit bigger) by a contractor and the cost ended up at about $40K.

We didn’t want to spend that much. :) So instead of using a contractor that oversaw the whole project, we used a few local guys who own their own small company. Overall I have found that the “smaller” guys can do the same services, at great quality, for sometimes half the price. Recently we even switched our heating and cooling company to a smaller, local company and have been incredibly pleased. I’m NOT saying the big guys are bad. We’ve just had great experiences with smaller businesses for the projects we’ve done. I would use a bigger company in a heartbeat for other projects.

I became the contractor in a way, overseeing the whole thing. I think we ended up saving at least ten thousand bucks by doing so. A few of you asked if I could have finished our basement. Could I? Yes, probably. Would I? No -- I’m one person and it would have taken me about ten years. And that’s a low estimate. :)

I worked with the guys and figured out a game plan – the timing of things is pretty self explanatory – framing, plumbing and electrical, drywall, trim and doors, carpet, etc.

honored tradition mohawk carpet

So to spread out the cost (we paid cash for the entire project), we broke each big step down monthly. Framing was in February and that involved a little bit of electrical too – we started with framing out the storage room so we could have a dedicated breaker box put in for the basement. Later we had the rest of the basement framed out as well. The total cost for framing (and that little bit of electrical) was $3300.

The basement is about 900 square feet and we wanted to have a HUGE family/play room as the main area, so that takes up about two thirds of the space:

bright finished basement

This is a partial basement for our house and it was “free” when we built. We had a bonus from the builder so we used that towards the partial basement. BEST decision ever. The full would have added about 300 square feet that would have been nice, but we really don’t need it.

A few details about this space – we went with eight foot ceilings because I about choked when I saw the cost to dig one foot deeper. Now I kind of wish we would have just done it but the height doesn’t really bother me. We didn’t add windows on purpose – it freaked me out to have windows down there, simple as that. :)

The next month we tackled plumbing and electrical and with the help of the professionals I figured out a lighting plan. I wanted a TON of light -- I never wanted it to feel dark down there unless we wanted it too. We ended up adding 28 overhead lights. (One we don’t use because we changed the floor plan a bit.) I added dimmers to almost all of them so we can turn it down when watching movies.

We had the bathroom roughed in when we built so there was a little bit of work to get that set up. We also added plumbing to move our washer and dryer down there and a kitchenette sink. Total cost for plumbing and electrical: $2,000.

basement lighting

That fireplace “cubby” is a future project. Very excited about it!

Speaking of fireplaces – let’s talk about the temperature. We did not have the walls insulated (we were told it wouldn’t help with temperatures much), but did have the ceilings all insulated. This was mostly for sound control – we barely hear people walking around above when we’re down there and it really does help with the sound when the kiddo and his friends are playing the drums. :) I cut two holes in our duct work and installed vents myself before the drywall was done. It was not an easy job – cutting that stuff is no joke. I wish I would have added one more vent in hindsight.

It is a little chillier down there, but we just turn on that fireplace and it’s toasty in no time. Sometimes we have to turn it off because it gets too warm. And in the summer the slightly cooler basement feels amazing. basement kitchenette

Next up was the drywall, which we hired out another small company to do. When you work with small contractors they know other small contractors and it definitely helps with the cost.

All the ceilings and walls were put up, taped, mudded and sanded in April and the total cost was $2000.
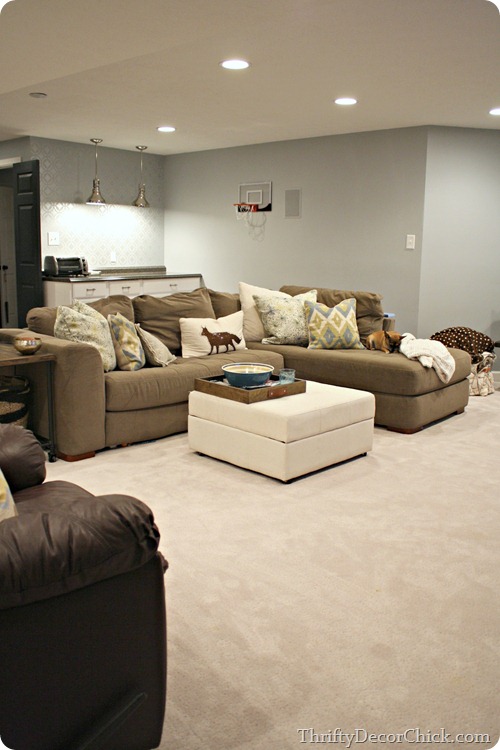
bright basement

By the way, the popcorn bowl wasn’t staging – I was actually eating it. The whole bowl. By myself.

Before the carpet was installed the whole space was painted – we used regular flat paint as the primer and ceiling paint and then I painted the whole space with Marina Gray (more on the other colors and details here):
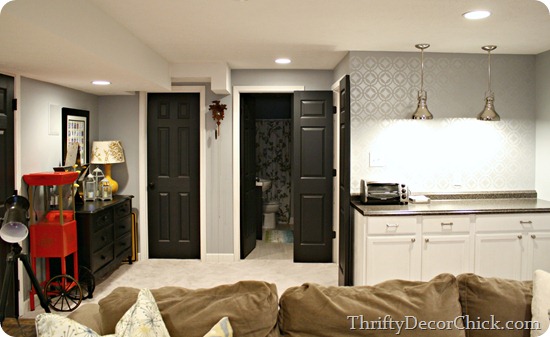
black interior doors

I painted the doors black last January and love them!

The bathroom straight ahead is this one: bright basement bathroom

This was finished out much later, about a year after the basement was finished – the only part we had installed during the finishing process was the shower.

That back area is hubby’s office and storage on one side and the laundry room and a bigger storage room on the other:

basement laundry

I’m still working on this space and figuring out more storage in there. I gotta say – we LOVE having the laundry down here. It’s SO much better than where it was before. It’s glorious having a dedicated space for doing laundry, I truly love it.

The final piece of the puzzle was trim and doors and carpet. The doors and installation were about $1000. We had the laundry doors done special order because I made that door way bigger – 36 inches wide – so we could easily walk in with baskets in our hands. I didn’t want a big three foot door swinging out and taking up space in either space so we went with the two doors instead. Love them. Still need to put hardware on them. :)

I installed all the baseboards – they are taller mdf base and I put them in before the carpet was installed (the installers said either was fine). Now I wish I would have done it after because I’ve run into a couple issues getting them to match up when I’ve done more recent projects.

The carpet was the part that made the space finally feel DONE:

light carpet basement

You can see more about that huge IKEA art here.

Again we used a local smaller company instead of a bigger shop. The price difference was unreal. We got REALLY great, high quality carpet and thick padding for about 800 square feet for $2000. That included installation.

Overall the entire basement finishing cost was about $11,000. We later did a few things like tile in the bathroom and laundry room, finishing the bathroom with a sink and toilet, and this huge built in:

built in cubby storage

And all of that stuff was about another $1500, but that was done throughout all of last year.

There’s still more projects we’d like to do down here – the fireplace wall, the kitchenette and hubby’s office are the big ones. I want add some kind of table where the drum set is eventually as well. I think it’d be nice to have a place to play games or do Legos or just sit and eat. Sigh. I LOVE basements. :)

I found overseeing the project to be quite fun – and that’s probably because we were in no hurry. We did it as we had the money and it took about six months. You get it all over much faster if you pay more, but I was fine with spacing it out. I think it helped to make sure we did things the way they would work best for us, you know? It kind of forced me to take my time when planning things out like lighting and all that stuff. So far it’s all worked really well for us!

If you have any other questions about this space I’d be happy to answer them! (All of the costs I mentioned included the materials by the way.) Let me know if I forgot anything. To see all the basement projects (and how we used it before it was finished!) go here.

Stenciling a wall

Hey hey all! How was your weekend? Uneventful here and we’re home today for President’s Day. I did make some progress on the basement kitchenette and I’m pretty excited about it considering I was a little anxious about it at first.

Last I left you I had told you about our little kitchenette spot that I’m super excited about:

IMG_7902

I had finally painted the cabinets and installed the countertop. I’ve actually made some progress over the past few weeks but this big project I finished up last night. My goal all along has been to tile the wall above the cabinets but I haven’t found what I want just yet. Actually…I have, but it’s really expensive. So I want to pull the rest of the area together first and then decide if I want to drop some cash on the tile.

So to dress it up in the meantime, I decided to go with a stencil instead:

How to stencil a wall

I thought it would work great with the slightly more modern vibe we have going in the basement. I actually had this one in my hands months ago for another project and decided against it but remembered it and went back for it. It was $17, but 40 percent off with my Hobby Lobby app and coupon.

When it came to the color to use with the stencil I went with this stuff from Krylon:

Silver paint

Again, from a project that never was. :) I got it last fall from True Value but I’m guessing you could find it anywhere Krylon is sold? I think it’s made to mix with another color but I liked it as it was – it’s a very light silvery finish.

Just like tiling or flooring, the first one is the most important – make sure it’s exactly where you want it because it will set the tone for the whole wall. Some use a light spray adhesive on the back but I didn’t need it:

How to stencil a wall

As long as the stencil is level it will lay down flat. I used my small one to check it each time:

How to stencil a wall

Now the amount of paint you use is really important. They sell stencil “stampers” at the craft store for projects like this but geesh, a wall would take forever with something like that. I always use a foam roller, just make sure you roll most of the paint out of it:

How to stencil a wall

You hardly want anything on there at all. If you have too much it will get under the stencil and you’ll be mad. :)

Use decent pressure to paint over it – not too heavy but enough it covers well:

How to stencil a wall The great part about using so little paint is that it dries super fast. I was able to keep moving and even use my delicate painter’s tape over it within about five minutes.

I stood back after a few and LOVED it:

Stenciled wall

It took a few hours – I did it while we watched the All Star game in the basement and it took the length of the game – about three hours from start to finish. The last little corner by the light switch took me longer than anything. It’s always the last part of the project…always.

But I was pleasantly surprised by it – I really love how it turned out!:

Kitchenette in basement

I was just using what I had but the silver paint ties in perfectly with the hardware and the lights. The drawer hardware is the same as what I used on the mudroom bench (from Lowe’s) and the door hardware I already had.

Here’s a look at it without the lights on:

Basement kitchenette with stenciled wall

Love it! I got the base installed around the cabinets while I was at it – it’s coming together!

Next steps – paint and caulk the base then install the shelving on the wall. I’m using these Ekby brackets with wood: 

ekby-bjarnum-bracket__03265_PE073754_S4

And then finally get that sink installed! (It will go on the right side of the kitchenette.) A wise reader reminded me we need to install a GFI outlet there since we’ll have water nearby, so that needs to happen too.

For now I’m really pleased with it and I toasted some pizza rolls last night to celebrate:

Stenciled wall in silver

:)

Once I get our basement cleaned up I plan to give a rundown on the whole space. I haven’t shared the costs and how our plan came together and want to do that.

Have you stenciled a wall? It’s been a while since I’ve done it (last time was in the pantry) and I’m always surprised with the difference it makes. It’s such an inexpensive project too!

A basement kitchenette

Hey everybody! It’s time for the kids to go back to school around here, after a THREE week break. I’ll miss the kiddo but getting back to the schedule will be good for us. I guess. Boo.

So I got a ton done again this weekend, but like the other projects I’m working on lately this one going to be a multiple step thing. This was step two of who knows how many but I’m excited about the progress! I like to share the process with you all instead of before with nothing and an after with it all done, cause obviously that’s not how it happens.

When we finished the basement last year we knew we wanted a kitchenette down there somewhere. It’s not a HUGE space though so we needed to make it work in a spot that wouldn’t take up a lot of room. We decided on a small wall in the family room, just outside the laundry room:

basement kitchenette

I shared that pic late last year after the cabinets were installed. What you don’t see is there is a rough in for a sink – the part I’m most excited about. :) But today we’re talking counters and paint.

I’ve gone back and forth on the counters for months now. My original plan was butcher block with an undermount sink, but then a few weeks ago I found a laminate counter I loved at Lowe’s. They didn’t have the one I loved in stock though, so I went back to my butcher block idea.

But getting the block means a long trip to IKEA (which I’m planning on doing today, but whatever, it was last minute) and I already need to get some butcher for the mud room bench, so getting two was going to get expensive. And then last week I was back and Lowe’s and the counter I loved was in stock and I noticed it was only $34! Thirty bucks people, seriously…I couldn’t believe it!

Laminate means no undermount sink but I’ve lived with a regular drop in sink for all of my 38 years so I think I’ll survive.

I tackled the installation of the counter last week and for the most part that’s easy – but I had to deal with the rough edge on one end:

installing laminate countertops

Thankfully there’s little kits that are sold right by the countertops for just this problem. It was nearly $20 so that cheap countertop get a little more expensive, but still, pretty good.

It comes with wood pieces and laminate for the edges:

installing laminate countertops

First you take those nailed in jobbies in the photo up above out, so the edge is flat. Then you nail the little bitty piece to the back to fill in that part:

installing laminate countertops

And then you’re supposed to do the same underneath with the long piece. This is all so the laminate edge has something to stick to. Well, this wall and the cabinets were pretty much exactly 72 inches (which I don’t think we did on purpose, but it was a nice accident so cabinets and counters were easy to find), but this meant there wasn’t enough of an overhang to add that piece of wood underneath the counter. So I just didn’t add it – we’ll see how this hold up without it.

The next step was a little scary – you take an iron and use it to “glue” the laminate on the edge of the countertop. I didn’t get pictures of this cause I was sweating, but I put the iron on medium heat and used a lot of steam (just as I do with webbing tape when “sewing”). I just steamed it like crazy and was careful not to hold the iron down on the laminate too long:

installing laminate countertops

It worked great! There’s stuff on the back of the laminate that melts and glues it right on. (You can hear it “crackle.”) I couldn’t get it to budge once it was dry. But as you see above, it’s not a perfect fit. The next step was to use a wood file and knock down the excess laminate along there.

I didn’t have a wood file and thought I could just file it down with a chisel. I was wrong. :) It didn’t work. It was about 9 p.m. and I so didn’t want to run out to get the annoying wood file, so I started trying anything I could find. It went…OK. ;) These heavy duty scissors worked for cutting vinyl tiles so I figured they would work for this and they did:

installing laminate countertops

But I couldn’t get close enough to the edge to get it flush. I was also afraid I was going to damage the counter by messing with it so much, so I put a line of my Frogtape along there to protect it:

installing laminate countertops

Then I went back at it again – this time with tin snips. :) With those I was able to get much closer to the edge. And then I got it real flush by ending with my original plan, the chisel:

installing laminate countertops

You can see there why I put the tape down – it really did help and the counters are just fine even after all that abuse. :) After all those tools and the time it took to get it all done, I just should have made the run to the hardware store, but whatever. I was already in my pj’s and not going anywhere.

The counter is actually quite cool, I love the way it looks! It’s got the “3D” look to it – it has a very minor texture that’s supposed to look like granite. We have similar counters upstairs and they get mistaken for granite on first glance all the time. They’ve also held up GREAT, so I know it will be perfect in the basement:

dark laminate countertops

So I know we still need to cut the hole for the sink but I wanted to make sure it was staying put for the time being, so I got some pillows to lay on and got underneath and secured it to the cabinets using screws:

photo 2 copy

Nice picture thanks to the Bub. ;) It was not the most comfortable thing I’ve ever done. Remember when doing this part to use screws that aren’t too long so they don’t go through the top of the laminate! Yikes.

Then…it was time for paint. Why must EVERY SINGLE PROJECT involve so much paint? WHY. I’ve done a coat of primer and one coat of glossy white on everything so far:

basement kitchenette

Yes, the kitchenette also serves as the basketball court. :)

The cabinets still needs another good sanding and one more coat of paint, but I was tired people. So. much. painting. 

Next steps are to install the hardware on the cabinets, continue the baseboard around the bottom, install the sink and then decide what I’m doing on that wall above. First I need to decide on uppers or no uppers – I wasn’t going to do any but more storage wouldn’t be a horrible thing, right? I’m thinking maybe skinny ones one easy side of the lights, then maybe shelving between. Or just shelves and no cabinets? No idea. It will come to me eventually.

So it’s not quite a full after yet, but a halfway after still makes me very, very happy:

basement kitchenette

We are just giddy about the thought of a kitchen sink down there. I swear we’re all just moving down to the basement. We’ll be back upstairs for the summer. Or not, it’s nice and cool down there in the hot months. :)

Have you ever installed countertops? Do you have this granite lookalike stuff? My dream one day would be soapstone counters, but until then the laminate holds up great! Hopefully I’ll be able to show you this space with a sink soon!

P.S. This color was called Labrador Granite, here’s a link to a larger piece.

Blog Archive