From our home to yours

Hello my friends! I’m so excited to see all the comments and emails on yesterday’s post. That will be open through the end of the week.

This year I really did less than ever with the holiday decor – I actually wanted to do more but time just didn’t allow. Next year I’m starting in October!! Kidding. As far as you know.

Of course like every year I didn’t really get the bug to do a lot of decorating till the past week or so – when things are crazy. It never fails. And in a few days I’ll be soooo ready to take it all down! :)

But with each passing year I like things a little simpler. I used to have a ridiculous amount of Christmas decor (I still have a lot) but now I much prefer to use what we already have and make it work for the holidays. Fresh greenery is my go to for years now – it’s free (from our yard) or pretty cheap (at the store) and NO STORAGE. Whoot!

Here’s a final look at our home at Christmas this year – I can’t believe how fast this season has gone!

I’m totally in love with these LED lights this year – I actually picked up these at Kirkland’s over the summer!:

led battery lights led battery lights

They were $10 for five feet and are battery operated. Even better – these have a timer option! I so wish I would have picked up more! I’ll be using them year round for sure.

They make for a pretty nightlight in our powder room:

plank walls bathroom

That little tree was from Ikea (someone mentioned on Instagram that those are less than $4 right now!) and I picked up a wreath as well:

ikea wreath

I wish I had grabbed another one of these – they have great texture and fullness!

I shared my crazy cheap Pottery Barn advent knock off last month:

Pottery Barn advent knock off

I absolutely love it – we hung it in the mud room and the Bub loves grabbing one of the bags every morning. One of my readers created one and hung it on the wall under her cabinets in the kitchen – I thought that was brilliant!

I showed you our new family room and kitchen earlier this month. I love pulling out the metal Goodwill candleholders every year:

free Christmas printables

They were all brass when I got them and now I’m kicking myself for spray painting some of them.

It was so fun to decorate this new space – we absolutely love it!:

Christmas decor toursimple Christmas decor

I think there are only four things you need for easy, pretty Christmas decor – fake snow, ornaments, greenery and lights. That’s it. You can fill accessories you already have sitting around and the greenery makes regular spots look festive:

simple Christmas decor

I didn’t do much in the kitchen – mainly just some decor on the shelves and table:    kitchen shelves Christmas decorating

I’m already dreaming of how fun it will be to decorate the “new” kitchen next year!

Printables are another biggie – along with my four staples they are becoming my favorite fast and easy way to add some Christmas touches. I printed off my Fa la la’s again this year:

Fa la la prints

And again…a bowl, a tray, a candleholder? Put ornaments in it. Easy!:

easy Christmas decor

I love our stairs and I love dressing them up this time of year:
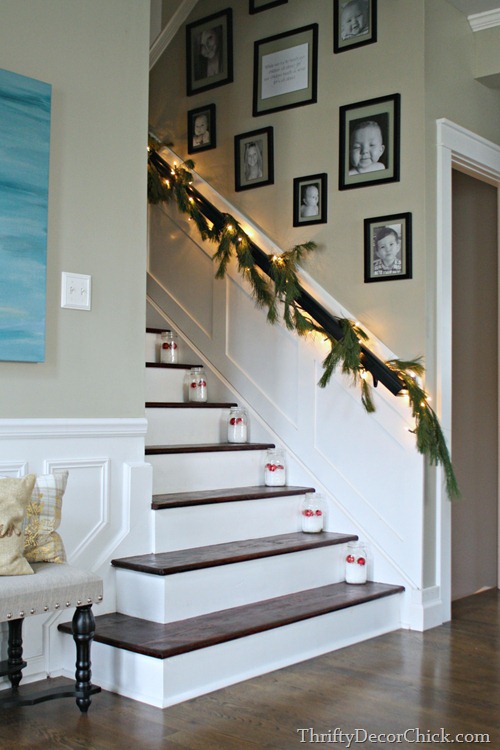
Christmas stairs

I just wrapped the fresh greenery around the railing, added some lights and then filled my Ball jars with snow and small ornaments. I put an LED votive candle in each one. Love this view to our new back doors:

The new library/den didn’t get as much decor this year either – just a few touches of greenery really:

DIY bookcases DIY built ins

In my opinion everything doesn’t have to scream holidays -- just adding a big thick cable knit blanket feels warm and cozy. :)

I love to add little holiday touches in our bedroom too – it just got some greenery and our skinny tree:

DIY headboard

I shared that room and how I decorated that tree in five minutes (and for cheap) here. I think it may be my favorite tree. :)

photo tree

Although I say that about all of them. :) Bertha is pretty amazing too:

gold red brown Christmas tree Be sure to follow that link to see all of the beautiful homes linked up to the annual party! And if you’d like to see more of our decorated home you can check out my Instagram account. :)

From our home to yours…Merry Christmas and happy holidays!! I hope yours is wonderful and you have an absolutely lovely time. I will be back next week!

Christmas Tree Party, 2014

Well hello! It’s that time again! I’ve hosted this little shindig for six years now – crazy! It’s time to gather together and show off your beautiful Christmas trees and decor:

Thrifty Decor Chick Christmas party

But first, mine! :)

We usually have four trees in our home – it sounds crazy but one I’ve never even decorated till this year:

skinny Christmas tree

And it was so easy and cheap – check it out here if you missed the bedroom tour earlier this week.

Another one is a real tree for the kiddo’s stuff – the fun one with colorful ornaments. I love it. (Check out last year’s party to see it more of that one.)

Those two are minimal effort and don’t take up much storage space.

A few years back I picked up a flocked tree for our newly finished basement:

flocked tree

Goodness, I love this tree. It was from WalMart and I’m still so happy with it. It doesn’t shed a ton of “snow” and you would think it would. It’s just so beautiful.

It’s only three pieces and super easy to set up – I had it up and fluffed within 30 minutes. Every Christmas break we pretty much hibernate in the basement for two straight weeks so it is lovely to have this down there:

flocked tree Walmart

Of our three faux trees I think this one looks the most real. It will look spectacular one day when that electric fireplace behind it is actually built into the wall. Been dreaming up that project for years now. :)

And our last one…I have a confession to make about our big tree. I call her Big Bertha. The Beast. Pain in my butt.

She’s huge and I kind of dread getting her out every year – isn’t that awful? When she’s up I’m so happy but the process wears me out. My husband goes along with pretty much all of my ideas for decor around the house and rarely has a strong opinion about things…but this tree is his baby. He loves Christmas decor and loves. this. tree.

Last year he was out of town and my sister helped me get all the pieces down from the garage – I thought I would be able to make things a bit easier by making it 10 feet tall instead of 12 feet (I didn’t put the bottom piece of the tree on so it was shorter).

Swear to God he noticed when he walked in the door – nobody would ever notice!! He did. So this year he pulled it down and we set up his baby in it’s full glory.

Twelve feet of tree takes some time to decorate – and it’s a workout on the ladder. Another reason this tree wipes me out? The cats LOVE IT. Our insane kitty literally climbs up around the inside of it and will poke his head out the top. It drives me absolutely crazy:

Colby cat

But last night I was taking pictures of it and I have to tell you…after pulling the cat out for the 15th time, my heart warmed and I just sat and appreciated Bertha:

brown, gold and red ornaments

That snowflake is made from the old Hoosier Dome top for you locals by the way – we spent a lot of time there back in the day so I had to get one. :)

She is a beast but my goodness…she is spectacular:

12 foot Christmas tree

It’s all worth it. :) And I love that my husband loves the tree so dang much:

train around tree

Although I’d be fine if this guy lost a little of the love:

Lowe's fake tree, 12 feet

I’m not gonna lie – I got a little emotional standing there last night, just taking a moment to enjoy it.

It is magnificent. :) Here’s the view from our second level:

12 foot tree

My “Fa la la” prints went back into the frames and they reflect the light beautifully:

Fa la la art

And of course a little bokeh never hurts:

bokeh Christmas tree Whew. It’s a lot of work but after all is said and done…so worth it. There is NOTHING like sitting by a lit up tree with all the lights off, am I right? So grateful.

Now I can’t wait to see your tree and decor! Link up here – and if you’d like to link back to TDC it would be appreciated but it is not mandatory.

I’ll be back on Monday – I’m currently in freak out mode to get all the shopping done. ;) Have a great weekend my friends!!

Photo tree and a holiday bedroom

Hello my friends! I’m starting to freak out a little bit…Christmas is next week right?? I’ve been ignoring this fact for awhile now. The funny thing is that I’m still decorating. It will only stay out for a couple of weeks but I’m really enjoying it so I continue to fluff. :)

I’ve tackled some little projects in our bedroom over the past few days and added some Christmas touches in the room. I’m especially excited about the tree! I got this one years back at Lowe’s after the holidays for $12. It’s super skinny and an easy one to store.

For the past few years I’ve only turned on the lights (it came with them) and left it at that. I’ve wanted to decorate it more but just never get to it. This year I took a few minutes and did something a little different. I wrapped some jute “ribbon” around the tree that I’ve had for awhile, then I picked out some of my favorite photos from over the year and printed them out.

I just stuck them inside the tree:

picture tree at Christmas

They are pictures of everyday stuff and from the wonderful trips we took this year (that one to the right is us on one of our four trips down Splash Mountain a few weeks ago. My husband’s face is AWESOME.)

I edited them so they were in a sepia tone:

picture tree at Christmas

I meant to print them out way smaller but it was a happy accident – I love how the bigger pics look. Our son and his nephew top the tree:

picture tree at Christmas

My heart is full! I am a lucky lucky girl.

It’s such a wonderful way to look back at our blessings this year. The Bub and my husband loved it:

picture tree at Christmas

I love having it our room but next year we may move it down to the family room. It would be perfect down there and may actually end up down there yet this year. :)

My tree skirt is just extra fabric left over from my DIY headboard in this room. I just fluffed it up around the tree, no hemming:

picture tree at Christmas

Our bedroom is one of my favorites in our house and it’s especially warm and cozy this time of year. I took some more pics to share with you today – including the obligatory bokeh pic:

I’m a blogger. It’s mandatory.

I took most of these at night because I especially love it then:

picture tree at Christmas

I kept most of the items on the mantel and just added some greenery and lights:

Christmas mantel fresh greeneryChristmas mantel

The art was painted by me – I was trying to create something for the family room weeks ago and this turned out too dark. It’s still a little dark for me but it fills this space for now. :) The frame is just cheap lattice wood.

This room is still very much in between – these walls are the original color I put up years ago, Tornado Watch (from Lowe’s). I have the new paint but this room is a doozy so I’ve been putting it off for a year months:

Jacobean stain hardwoods

I want to do a treatment to that fireplace wall – I’ve been trying to figure out what I want to do and I finally have a plan!

The new wall color is lighter and will look lovely – I just want to make sure to keep a cozy feel in here: 

grays in bedroom I have plans for that long bench too – it’s the perfect size and super comfy so I plan to redo it so it works in the room a little better.

I LOVE this space though, even half way “there”:

board and batten gray wall

Have you decorated a tree in a unique way? I’ll be saving these photos and will just add to them next year. Love it!

Speaking of trees…my annual Christmas tree party will be held later this week! If you are a blogger, please join me this Thursday and show off your trees and home tours. If you’re not a blogger, grab a cup of cocoa and enjoy!

Thrifty Decor Chick Christmas tree party

I’ll see you back here for the party! Whoot!

The perfect Christmas cookie

I’m in the kitchen again…I know, don’t pass out. It happens occasionally. ;) I’m hosting a Christmas party for girlfriends tonight (we had to do it on a weeknight because this time of year is so crazy!) and we’re doing a cookie exchange as well.

I begged my sister to come over to help make some with me (she’s the baker). She was too busy but passed on her favorite snickerdoodle recipes she found here – it’s a quick and easy one and I had most everything on hand.

If you can’t tell by now quick prep and easy ingredients are my staples when it comes to cooking. I don’t share many recipes on the blog but when I do you know it’s good and easy to make!

Here’s what you’ll need for these easy snickerdoodle cookies:

1/2 c. butter, softened
1/2 c. shortening
1 1/2 c. white sugar
2 eggs (room temp)
2 teaspoons vanilla extract
2 3/4 c. all-purpose flour
2 teaspoons cream of tartar
1 teaspoon baking soda
1/4 teaspoon salt (which I forgot to add and they are still wonderful)

For topping:

2 tablespoons white sugar
2 teaspoons ground cinnamon

I used my mixer for this recipe but the comments say you’ll get an even fluffier cookie mixing by hand. I was doing this quick so didn’t want to mess with that – and they still came out plenty fluffy. :)

Preheat oven to 400 degrees. Cream together the butter (1/2 c.), shortening (1/2 c.), sugar (1 1/2 c), two eggs and vanilla (2 teaspoons). Then blend in the flour (2 3/4 c.), cream of tartar (2 teaspoons), baking soda (1 teaspoon) and salt (1/4 teaspoon). Again, I forgot the salt so I don’t think it’s necessary.

The dough will be thick but easy to work with:

snickerdoodle cookies

I read after I was done that if you don’t have cream of tartar (which is one item I had to pick up) that you can substitute two teaspoons of lemon juice or vinegar for one teaspoon of the tartar – good to know!

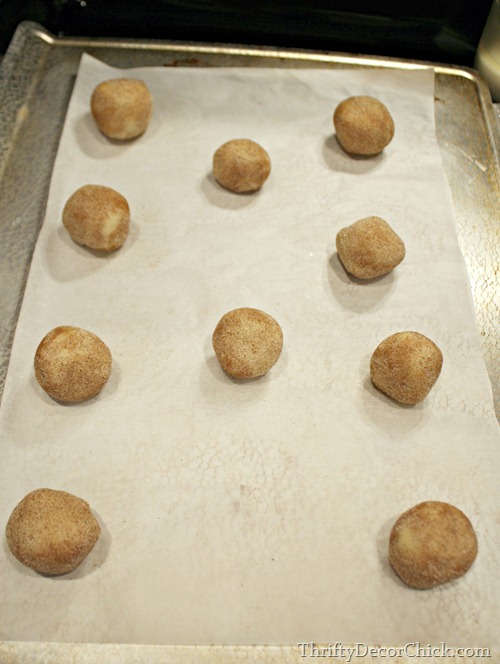
After mixed well, shape them into balls and them roll them in the cinnamon sugar topping:

snickerdoodle cookies

Pop them in the oven for eight to ten minutes and that’s it! I did eight minutes on the dot for each batch and then immediately put them on another tray to cool. They are PERFECT.

The recipe says this makes 48 cookies but I made mine bigger so I ended up with about 30. We now have about 26 left. Oops.

easy snickerdoodle cookies

I think snickerdoodles are the perfect Christmas cookie! I’ve never made them before now and was surprised with how easy they were to make. Maybe baking isn’t that hard? ;)

Can’t wait to see what the girls bring tonight. I’m hoping we have enough of these left by then. I had one for breakfast:

easy snickerdoodle recipe

Do you have an easy Christmas cookie recipe you love? Feel free to share it in the comments!

I’m off to clean my entire house, whoot!

Christmas home tour, part 1!

Hello my friends! It’s that time of year again – I’m joining 19 other bloggers for another series of beautiful holiday home tours:

holiday home tours

My friend Just a Girl is our host and if you’re visiting from Decor Chick’s Christmas kitchen, welcome!

So here’s the thing…I had every intention of this being a whole house tour. Then I realized there was NO WAY I was getting everything decorated…and clean enough for pictures. And then I ran out daylight and couldn’t get any more good shots so this whole house tour is now a two room tour. But there will be more! Consider this part one of three…or five?

And I took 130 photos of just these rooms so I think you’ll be happy I’m breaking this up a bit. ;)

I was SO excited to decorate our “new” kitchen and family room for Christmas this year. The actual kitchen hasn’t gotten it’s makeover yet, but the layout is totally different and WE LOVE IT! Goodness, it’s wonderful.

I’m going to try to not talk much here and just let the photos do it for me:

holiday home tour @thriftydecorchick

I shared the kitchen shelves decked out for the holidays here but I had to share them again because I FINALLY finished the trim up by the crown:

Christmas kitchen shelves Again, this area (where the table is) is where our sectional used to sit – that gives you an idea of how much space we gained when we took down a wall.

The to do list is just starting in the kitchen – painting the trim in the bay window is first up:holiday home tour @thriftydecorchickAfter that…well, you’ll just have to stay tuned for the plan. :)

I didn’t do a lot of Christmas decorating in the kitchen this year – overall I’ve cut down on the Christmas decor I use. I much prefer to change up the items I already have out and make them look a little more festive.

I did add a little rosemary tree (I use rosemary for our Christmas prime rib):

holiday home tour @thriftydecorchick Christmas window

And those curtains? A set of $5 towels from HomeGoods:

holiday home tour @thriftydecorchick

The kitchen table has a red, green and white runner and my DIY wood trough that normally sits on the fireplace: 

DIY long wood boxDIY long wood box

You can take just about anything, stuff it with greenery and pinecones…and it will look fantastic this time of year. Use what you have!

I have so many favorite parts of this room now – one of those being the new doors:

double atrium doors replacing window

They completely, 100 percent, change the look and feel of the entire space. And they function so much better too – they were meant to be here from the start.

The family room got a few touches of Christmas, but I’m most excited about the fireplace and built ins:

holiday home tour @thriftydecorchick 

I’ve been looking for skinny sconces for months and I found them yesterday:

 fireplace with built ins for electronics

They aren’t really sconces at all, but candleholders from Hobby Lobby. I got the idea from what Lindsay did over her fireplace. I took the handles off, hung them each with a nail and there. you. go. They are so pretty and exactly what I was looking for:

sconces from candleholders

They are half off this week for $12! Love them!

Anymore I use real greenery for most areas inside – I just love the look of it and there’s no storing it year to year! It’s my splurge every Christmas, but this 20 foot piece I used on the mantle was only $15 at Lowe’s:

Christmas mantel real greenery

I let it cascade down onto the built ins and wrapped a couple strands of lights around it. On the top of the fireplace I just filled it with brown ornaments and pine cones:

brown ornaments with garlandgreenery and brown accents

I filled in some areas with cuttings from our real tree to fluff it up a bit. I absolutely LOVE it!

natural greenery fireplace

I found some beautiful (free!) printables that Kellie created last year and put them in our frames that lean on the built ins:

free chalkboard printable

free chalkboard printables

There are four total and they are so pretty! Love it!! I hope to use more around the house.

The metal candlesticks are all Goodwill finds from years back and I always seem to find a place for them at Christmas. They are so elegant and pretty!

I LOVE how this whole area turned out. The new “sconces” really make all the difference I think: gray fireplace herringbone tile

I have them centered on the TV but I may move them up just a bit…we’ll see. I’m just so excited I found what I was looking for. :)

I said I wasn’t going to talk, didn’t I? Oops. OK…I’ll shut up -- enjoy the rest of the pics!:

gray fireplace and built insholiday home tour @thriftydecorchick placemat pillow holiday home tour @thriftydecorchick gold sunburst mirror holiday home tour @thriftydecorchicknoel sign knock off pottery barn

For the tutorial on that Pottery Barn knock off art, go here.

Just including this one because I loved how it focused in on the wreath in the reflection. :) At first glance I thought the whole shot was out of focus:

holiday home tour @thriftydecorchick holiday home tour @thriftydecorchickThis reminds me…Elf needs to find a new spot for the day. :)

Whew! See, aren’t you glad I couldn’t take more pics?? I’ll be back with more of the house soon. For now I’m enjoying a couple spaces that don’t have pine needles all over the floor.

Next up on the tour is Emily from Eleven Gables! Her home is stunning! I’ll update the list of blogs as we go through the week but here’s the list so far:

Just a Girl
The Inspired Room
Kevin and Amanda
Home Stories A to Z
Decor Chick

Tuesday

Eleven Gables
Hi Sugarplum
TidyMom
Beneath My Heart

Thanks for visiting! :)

Blog Archive